Do Gutter Guards Get Clogged? Understanding Prevention and Solutions

When you install gutter guards, you’re aiming to reduce the amount of debris that clogs up your gutters. However, this doesn’t mean your gutter system will be entirely maintenance-free.

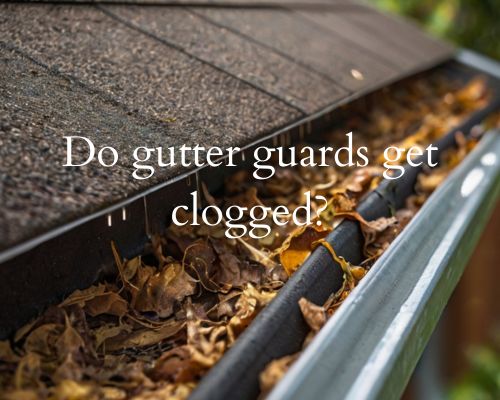
Gutter guards can still get clogged, particularly if you don’t maintain them properly.

a clogged gutter guard due to stacks of leaves

Leaves, twigs, and other small debris might still accumulate on top of the guards, leading to potential blockages that could affect the effectiveness of your gutters.

“While gutter guards significantly reduce the frequency of cleaning, you will still need to inspect and clean them, albeit less often.” said Mike Owen from Gutters Of West Palm Beach.

Investing in gutter guards is beneficial for minimizing the heavy lifting when it comes to keeping your gutters clear, but routine maintenance remains necessary. Understanding that no system is entirely foolproof will help set realistic expectations and ensure your home remains protected from water damage and pest infestations.

Benefits and Effectiveness of Gutter Guards

Gutter guards offer several advantages by preventing clogs, protecting critical parts of your home, and reducing costs associated with gutter maintenance. Below, you’ll find specific details on how they achieve these benefits.

Preventing Clogs and Improving Water Flow

Gutter guards are designed to keep leaves, twigs, pine needles, and other debris from entering your gutter system.

By preventing these materials from accumulating, water can flow freely through your gutters.

Blocked gutters can cause water to overflow, leading to potential damage. Gutter guards utilize surface tension to improve water flow, reducing the risk of clog-free performance.

This ensures that rainwater is effectively channeled away from your home, protecting it from possible water damage.

Protecting the Roof and Foundation

Properly installed gutter guards help prevent water damage to your roof and foundation.

By maintaining a clear gutter system, you minimize the chance of leaks, ice dams, and other issues that can compromise your roof’s structure.

Water that overflows from clogged gutters can seep into your foundation, causing cracks and structural issues. Gutter guards reduce this risk by ensuring water is directed away from your home.

This protection extends the life of your roof and foundation, preserving your home’s integrity.

Reducing Maintenance and Long-Term Costs

One of the significant benefits of gutter guards is the reduction in maintenance tasks like gutter cleaning, saving you time and money.

While the initial upfront cost of installing gutter guards can be high, ranging from $4,000 to $7,000 professionally, the savings in maintenance can make it a worthwhile investment.

You won’t have to constantly climb ladders to clear out debris, reducing gutter maintenance strain. In the long run, these guards can save you money on maintenance services.

Fewer clogs mean fewer needs for gutter cleaning services, ultimately making the systems cost-effective.

Considerations for Choosing Gutter Guards

When selecting gutter guards, you need to think about the types and materials available, the installation and maintenance requirements, and how your local climate and environment might impact your choice. Let us know more on these with Mike Owen from Gutters Of West Palm Beach.

Types and Materials

Gutter guards come in various types and materials, each offering distinct advantages and disadvantages.

  • Screen gutter guards are made of metal or plastic and are effective at blocking large debris while allowing water to pass through.
  • Micro-mesh guards filter out smaller debris but may be more expensive.
  • Reverse curve designs direct water into the gutter while deflecting debris.
  • Brush and foam gutter guards are simpler DIY solutions but might require frequent replacement.

Materials such as vinyl, aluminum, and stainless steel affect durability and cost. Vinyl and plastic are affordable but can degrade over time, whereas metal options like aluminum guards provide longer-lasting protection but come at a higher price.

Installation and Maintenance Requirements

Your decision on gutter guards should take into account the installation process and the level of maintenance needed.

DIY options, such as foam guards or simple screen guards, are quicker to install but may not be as effective or durable.

Professional installation often comes with a higher upfront installation fee but can offer better reliability and longer-lasting results.

Regular maintenance is vital. Even the best gutter guards can experience blockages from smaller debris or require occasional clearing to prevent ice dams or pest infestations.

Specific designs like micro-mesh may demand less frequent upkeep than other types but might carry a higher initial cost.

Assessment of Local Climate and Environment

Choosing the right gutter guards also means considering your local climate and environmental conditions.

If you live in areas with heavy rainfall or windy conditions, you may need robust, professionally installed options. These guards should handle large volumes of water and resist elements. For these situations, aluminum guards and micro-mesh varieties are excellent.

Regions with many trees might lead to more blockages, so you need guards that can effectively filter leaves and twigs. Conversely, areas prone to ice and snow need guards that can prevent ice dams in winter. They should also efficiently handle water flow in spring and fall.

How Much Does It Cost to Put Gutter in Florida? Comprehensive Pricing Guide

When considering gutter installation in Florida, understanding the associated costs is crucial for planning your budget. Let us have this with Mike Owen from Gutters Of West Palm Beach.

a good gutter installed in home in Florida

On average, you can expect to spend between $1,000 and $3,000 for a 2,000-square-foot home.

The cost per linear foot ranges from $5 to $15. This range depends largely on the materials and the overall layout of your house.

The climate in Florida, known for its heavy rainfall, makes quality gutters an essential investment for your home.

Professional gutter installers in Florida typically charge between $1.60 and $9 per linear foot.

This variation is influenced by the type of gutter and labor costs specific to the Sunshine State.

Different materials come with different price tags.

Aluminum gutters, a popular choice, average around $3,900 nationally for 200 linear feet, while other materials like vinyl and steel can also impact the total cost.

Prioritizing quality and professional installation ensures your investment will effectively protect your home’s foundation from water damage.

Factors Influencing Gutter Installation Cost

Several factors can affect the cost of installing gutters.

These include the type of material used and the complexity of the installation process. Each of these elements plays a significant role in your project’s total expense.

Types of Gutters and Material Prices

The choice of gutter materials significantly impacts the cost.

Aluminum gutters are the most common due to their durability and average cost range of $2,300-$3,900.

Vinyl gutters are more affordable, generally costing between $600 and $1,710.

Steel gutters offer durability and strength at a mid-range price. For premium options, you may consider copper or zinc gutters, which offer exceptional durability but can cost substantially more.

MaterialAverage Cost Per Linear Foot
Aluminum$13 – $34.50
Vinyl$6 – $17
Steel$9 – $22
Copper$40 – $61.40
Zinc$22 – $45

Size and Complexity of the Installation

Your home’s size and architectural complexity can also influence installation costs.

Larger homes require more materials and labor, thereby increasing costs.

A home with multiple stories or a complex roofline could result in higher labor expenses due to additional safety measures and longer installation times.

Sectional gutters can be less expensive up front but require more joints which could mean higher maintenance over time.

Seamless gutters, on the other hand, are custom-fabricated and minimize leaks but may cost more due to the specialized equipment needed for installation.

Labor Costs and Installation Time

Labor is a significant component of gutter installation costs.

Prices can vary based on the local labor market in Florida.

Gutter installation labor typically ranges between $13 and $34.50 per linear foot.

Additionally, replacing old gutters adds to the labor cost due to the removal process.

The time required for installation depends on the gutter system chosen and the complexity of your home’s design.

Experienced contractors may charge higher rates, but they often ensure quicker and more reliable installations. See Mike Owen from Gutters Of West Palm Beach.

Be mindful that labor costs can also fluctuate based on the season, with higher prices during peak times.

Additional Considerations

When installing gutters in Florida, you should account for long-term costs and aesthetic options.

Ensuring you understand the complete financial picture can help you avoid unexpected expenses.

Long-term Maintenance and Repair Costs

Maintenance and repair forms an essential part of gutter ownership.

Regular cleaning is necessary to prevent blockages that could lead to water damage.

Gutter guards can be an upfront investment to reduce the frequency of maintenance.

Typical costs for maintenance range from $70 to $200 per visit.

Gutter repair for leaks or sagging can cost between $150 to $500 depending on the severity.

Keep in mind that different materials like aluminum or copper have varying longevity and maintenance needs.

Gutter Customization and Aesthetic Choices

Gutter customization enhances your home’s architectural style and increases curb appeal.

Options include K-style, half-round, and Victorian ogee gutters, each providing unique looks.

Material choices, such as aluminum, vinyl, or copper, affect both cost and appearance.

For example, copper gutters provide a luxurious touch but cost more. Colors and finishes allow for further personalization.

Keep the gutter width and shape in mind to optimize both function and aesthetics.

Potential for Additional Expenses

Installing gutters may involve additional expenses beyond the basic setup.

Gutter removal for outdated systems adds $1 to $3 per linear foot.

Fascia board replacement can cost $9 to $34 per foot, especially if water damage is present.

If your home has multiple stories, expect an increase of $1 to $3 per linear foot for installation.

Landscaping adjustments might also be necessary to direct water flow away from your foundation.

What is the Best Solution for Roof Leakage? Expert Recommendations and Options

Discovering a roof leak can be a homeowner’s worst nightmare. It often leads to water damage and costly repairs if not addressed quickly.

a damage roof due to leakage

When faced with roof leakage, the best solution depends on the size and type of the leak. For minor leaks, products like Flex Seal Liquid Rubber in a Can can be quite effective. This product offers a quick and easy fix.

Based on CJ Commercial Roofing NJ, if you encounter larger leaks, Liquid Rubber Waterproof Sealant is a highly recommended option due to its excellent waterproofing capabilities.

Preventative maintenance also plays a crucial role in managing roof health. Regular checks, especially after heavy rainstorms, can help you identify signs of a leak before they turn into significant issues.

Addressing roof leaks promptly not only saves money in the long run but also helps maintain the structural integrity of your home. The right products and a proactive maintenance approach can keep your living space dry and secure, safeguarding it from potential water damage.

Identifying and Assessing Roof Leak Causes

Knowing how to identify and assess the causes of roof leaks is essential to mitigate damage and ensure proper repair.

Key areas include common leak sources and precise diagnosing techniques to pinpoint issues effectively.

Common Sources of Leaks

Leaks can originate from various sources on your roof. Damaged or missing shingles often lead to leaks, especially after storms or extreme weather.

Check for cracked, curled, or missing shingles that expose the underlayment.

Flashing around chimneys, vents, and skylights can deteriorate over time, allowing water to seep through. Inspect these areas regularly for signs of wear.

Vent boots and roof nails can also be problematic. Ensure vent boots are intact and sealed properly, as these sealants can crack and peel away. Look for rusty or loose nails, which compromise the roof’s integrity.

Lastly, consider ice dams during winter months. They prevent water from draining properly, forcing it under the shingles and into your home.

Diagnosing Leaks with Precision

To diagnose leaks accurately, start by locating water stains or mold growth on your ceiling.

Inspect your attic to find moisture trails leading back to the source. This can often be traced to a specific area of the roof deck above.

Test the suspected area using a garden hose. With a helper inside, soak sections incrementally. Start from positions near the eaves and move upward.

This method isolates the location, making it easier to identify the precise cause. Also, check for damaged insulation as wet spots can indicate nearby leaks.

Effective Solutions for Roof Leakage

Addressing a leaky roof promptly is essential to prevent structural damage and additional costs. You should consider both immediate temporary fixes and long-term preventive measures to ensure your roof remains sturdy and leak-free.

Temporary Fixes for Immediate Action

When faced with an urgent roof leak, you need quick and effective solutions.

Start with a thorough visual inspection from ground level or use a ladder if it’s safe. Identify the source of the leak using a garden hose to simulate rain and pinpoint problem areas.

Apply a tarp over the affected area to prevent further water damage. Use roofing cement or caulk to seal minor holes or cracks.

Roof sealant can be an immediate barrier against rain. Tools like a putty knife and a hammer will help in applying these materials effectively.

Long-Term Repairs and Prevention

For a more permanent solution, you should consider professional roof repair or replacement. Damaged shingles or flashing need to be replaced promptly.

Regular maintenance, such as clearing clogged gutters and inspecting roofing materials, helps prevent leaks.

Waterproof all surfaces, including ceilings and walls. Installing proper roof ventilation reduces UV ray damage and prolongs roof life.

DIY repairs are an option, but hiring a roofing contractor like CJ Commercial Roofing NJ ensures that the job is done correctly.

Choosing the Right Materials and Professionals

Selecting the right materials is crucial for durable repairs.

Liquid rubber waterproof sealant and urethane sealant are highly recommended for their effectiveness.

For larger repairs, metal roofing is a resilient option. Meanwhile, for RV roobfs or flat roofs, look into specialized sealants that provide flexibility and weather resistance.

Engaging a qualified roofing contractor with expertise in your specific roofing type guarantees high-quality work.

Make sure the contractor uses high-quality tools such as a pry bar, utility knife, and roofing nails during installation.

Prioritize safety measures, including using safety ladders and adhering to best practices to maintain the longevity and effectiveness of your roof repairs.

Does TPO Require a Cover Board? Key Considerations Explained

When considering the longevity and performance of a TPO roofing system, the use of a cover board is a critical topic. Whether or not TPO requires a cover board largely depends on factors such as foot traffic, roof durability needs, and environmental conditions.

A cover board, typically made of gypsum, provides a more solid backing than insulation alone, enhancing puncture resistance and overall membrane integrity.

A stack of cover boards sits next to a TPO installation, ready for use

In scenarios where the roof will experience regular foot traffic or be exposed to harsh weather conditions, incorporating a cover board becomes highly advisable. This layer reinforces the membrane, allowing your TPO roof to better withstand hail, wind, and potential fire damage. Moreover, a cover board can extend the life of the roofing system by offering additional protection to the underlying insulation material.

Charles Jimerson from CJ Commercial Roofing NJ has to say that skipping the cover board might seem cost-effective at first, yet it can compromise the durability and performance of your TPO roofing system in the long run. For those looking to optimize their roof’s strength and lifespan, integrating a cover board is a strategic decision that provides robust support and added resilience.

Essentials of TPO Roofing Systems

Understanding the key elements of TPO roofing systems can help you make informed decisions about materials, installation techniques, and the role of insulation in achieving optimal performance and longevity.

Composition and Advantages of TPO Membranes

TPO (Thermoplastic Polyolefin) membranes form the outermost layer of TPO roofing systems. TPO is a single-ply roofing membrane known for its durability and energy efficiency.

These membranes are available in different thicknesses, typically ranging from 45 to 80 mils. Thicker membranes offer greater durability and puncture resistance, making them suitable for various environments.

TPO membranes are highly reflective, providing a cool roof solution that helps reduce energy costs by reflecting UV rays and minimizing heat gain. This characteristic makes TPO a popular choice for both commercial and residential roofing applications.

TPO Installation Techniques

Proper installation of TPO roofing involves several methods to ensure durability and performance.

Common techniques include mechanically attached systems and fully adhered systems.

In mechanically attached systems, the membrane is fastened to the roof deck using screws and plates. This method allows for fast installation and is ideal for high-wind areas.

Meanwhile, fully adhered systems use adhesive to bond the membrane directly to the substrate. This provides a more seamless appearance and enhanced resistance to wind uplift.

Seams are sealed using a hot air welder, which heats the membrane to create a strong, watertight bond. Contractors must follow manufacturer guidelines for installation to ensure the roof’s longevity and effectiveness.

Role of Insulation in TPO Roofing

Insulation plays a crucial role in the performance of TPO roofing systems. It helps improve energy efficiency by maintaining consistent indoor temperatures and reducing heating and cooling costs.

Common insulation materials used in TPO roofing include polyisocyanurate (polyiso) and expanded polystyrene (EPS).

Polyiso has a high R-value per inch of thickness, making it an excellent choice for energy conservation. Meanwhile, EPS is cost-effective and provides good thermal performance.

Insulation boards can also enhance the roof’s durability by protecting the TPO membrane from punctures and impact damage, while improving the overall strength of the roofing system. Proper insulation selection and installation are vital for achieving the desired energy efficiency and durability.

Cover Board Fundamentals and Installation

Cover boards play a crucial role in enhancing the overall performance and durability of your roofing system. By understanding their importance, selecting the right materials, and following proper installation procedures, you can ensure a longer lifespan for your roof.

Understanding the Need for a Cover Board

Cover boards provide a more solid backing than insulation boards alone, greatly improving puncture resistance and long-term durability. This is essential, especially in areas subjected to regular foot traffic or where maintenance and inspections are frequent.

Cover boards also add an additional layer of fire resistance, contributing to overall safety. They act as a suitable substrate for the TPO membrane, ensuring a watertight and strong roof system.

Selecting the Right Cover Board

When choosing a cover board, you must consider materials, thickness, and R-value.

Common materials include ¼” gypsum boards, which are highly fire-resistant, and high-density polyiso boards that offer better insulation.

The thickness chosen should align with the specific needs and structural load capacity of your roof. Costs can vary, so balancing budget constraints with performance requirements is key. You may benefit from consulting a professional roofer to make an informed decision.

Cover Board Installation Procedures

Proper installation of cover boards is critical for achieving the desired performance and lifespan of your roofing system.

Start by ensuring the existing roof is clean and free of debris. Fasteners and adhesives should be used according to the manufacturer’s guidelines.

Mechanical fasteners and specially coated plates can provide secure attachment. Regular inspections during and after installation help identify any issues early.

Employing a skilled roofing contractor, see Charles Jimerson from CJ Commercial Roofing NJ, will help ensure the installation is performed correctly, reducing potential for future roof repair.

Make sure to factor in labor costs as they can vary based on the complexity of your roof system.

In summary, proper selection and installation of cover boards contribute significantly to the roof’s durability, performance, and safety. Regular maintenance and inspections are essential to maintain the integrity of the roofing system.

How to Estimate My Roof Plan: Essential Tips and Techniques

Estimating your roof plan accurately is essential for budgeting and planning any roofing project. Let us know how with David Spade from Star Roofing Contractors.

a roofing estimate

Start by measuring the length and width of your house to determine the area in a flat plane.

Next, include the roof’s pitch, which represents the steepness or angle of the roof.

A roofing calculator can then use these values to give you a precise estimate of your roof’s area.

For roofs with complex shapes or multiple sections, break them down into simpler geometric forms like rectangles and triangles.

Calculate each section separately and sum them up for the total area.

For triangular sections, you can use the formula (length × height) / 2 to find the area.

Accuracy in these measurements is crucial for a reliable estimate.

A variety of online roofing calculators are available to automate this process.

These tools allow you to enter dimensions, roof pitch, and even material preferences, giving you a quick and detailed estimate.

This not only saves time but also ensures that you have a clear understanding of the necessary materials and costs involved.

Understanding Roof Dimensions and Calculation Basics

Accurately estimating your roof plan involves measuring the roof area, determining the roof pitch, and calculating the total number of roof squares. These elements are crucial for proper roofing installation and material estimation.

Measuring Roof Area

Begin by measuring the roof’s dimensions.

Use a tape measure to determine the length and width of each section.

For rectangular sections, multiply the length by the width to obtain the area in square feet.

For triangular sections, measure the base and height and use the formula:

[ \text{Area} = 0.5 \times \text{Base} \times \text{Height} ]

If your roof has multiple sections or irregular shapes, break it down into smaller rectangles and triangles, calculate each area, and sum these values to get the total roof area.

Determining Roof Pitch

Rather than hiring a professional, you can measure the roof pitch yourself.

To identify the pitch, measure 12 inches horizontally from the edge of the roof.

Then, measure vertically from the roof surface to the level point aligned with the 12-inch mark.

This vertical measurement, often called the rise, gives the pitch as a ratio (e.g., a 6/12 pitch means the rise is 6 inches for every 12 inches of run).

You can also use an area calculator or pitch angle tool to convert the rise/run ratio into degrees, offering another way to understand the slope.

Calculating Roof Squares

A roofing square is a 10×10 foot area, equal to 100 square feet.

After measuring the total roof area and calculating the pitch, you can determine the number of roof squares required.

Multiply the total roof area by the pitch factor (a value that accounts for the slope) to adjust for the increased surface area.

For example:

[ \text{Roof Area} = 2,134 \ \text{square feet} ]

[ \text{Pitch Factor} = 1.054 ]

[ \text{Adjusted Area} = 2,134 \times 1.054 = 2,249.24 \ \text{square feet} ]

Next, divide this adjusted area by 100:

[ 2,249.24 \div 100 = 22.5 \ \text{roof squares} ]

This final figure tells you how many roofing squares of materials you need to cover your roof properly.

Selecting Materials and Estimating Costs

Choosing the right roofing materials and accurately estimating costs are essential steps in planning your roofing project. This involves selecting appropriate materials, calculating material costs, and budgeting for additional expenses.

Choosing the Right Roofing Material

When selecting roofing materials, consider factors like durability, climate appropriateness, and aesthetic appeal.

Asphalt shingles are popular due to their affordability and ease of installation.

Metal roofing offers longevity and resistance to harsh weather but can be more expensive.

Clay tiles provide a traditional look and excellent insulation but are heavy and require robust structural support.

PVC and TPO are ideal for flat roofs, offering durability and energy efficiency.

Solar shingles integrate solar energy production with roofing, saving on energy bills while providing a sleek look.

Evaluate your options based on the longevity, maintenance requirements, and initial costs.

Calculating Material Costs

Estimating material costs starts with measuring your roof’s area.

Use a roofing calculator to input your roof’s dimensions, slope, and complexity to get an approximate area in square feet.

Common materials are sold by the “roof square,” which equals 100 square feet.

For example, asphalt shingles typically cost around $100 per square.

Metal panels can range from $120 to $900 per square, depending on the type.

Composition shingles are another middle-ground option.

Add costs for underlayment like felt paper, leak barriers, and ridge caps.

Consider disposal and waste factors—buy extra to cover at least 10% waste due to cutting and fitting around valleys, chimneys, and eaves.

Budgeting for Additional Expenses

Aside from materials, labor is a significant part of your roofing project.

Roofing contractors generally charge based on the complexity of the job. This includes steep roof slopes and multiple valleys. Labor costs can range from $50 to $150 per square. Factoring in the removal of an old roof can add significant fees. See David Spade from Star Roofing Contractors for better costing.

Don’t forget additional expenses like permits, fasteners, and drainage systems.

Installing accessories such as solar panels or solar shingles will also increase costs. Lastly, allocate budget for potential roof repair costs to tackle unforeseen issues during installation.

Do You Build Roof or Walls First? Essential Construction Sequence Explained

When embarking on a construction project, one of the most pivotal decisions you’ll encounter is whether to build the roof or walls first.

For most post-frame buildings, it is often beneficial to install the roof before the walls. This approach allows the structure to be somewhat weather-proofed, offering protection during the concrete pour and other foundational tasks.

roof building

Installing the roof first can also aid in maintaining the integrity of the concrete slab, as it shields it from rain and extreme weather. This method allows pre-mix trucks to have clear access to the site, reducing the need for additional, costly equipment such as pump trucks.

“By prioritizing the roof, you can streamline the construction process. This step ensures that the building remains dry and the interior work can proceed without delays. This is particularly advantageous in climates with unpredictable weather, as it minimizes disruptions caused by rain or heat.” said David Spade of Star Roofing Contractors.

Understanding Roof and Wall Construction

When building a structure, the roles of foundations, roof designs, and wall frameworks are crucial. Each component contributes significantly to the overall structural integrity, durability, and compliance with building codes.

The Role of Foundations in Structural Integrity

Foundations serve as the base that supports the weight of the entire structure. A solid foundation ensures stability, preventing shifting or settling of the building. Various materials can be used for foundations, such as concrete, stone, or treated wood, chosen based on soil type and climate.

Properly prepared foundations must be level and plumb to support walls and roofs effectively. Foundation inspections and permits are essential for ensuring safety and compliance with local building codes.

Basics of Roof Design and Function

Roofs protect the building from weather elements and help maintain energy efficiency by providing insulation. The design of a roof includes materials like shingles, metal, or tiles chosen based on regional climate and building style.

Roof framing typically involves trusses or rafters, adequately spaced to distribute the weight evenly. Sheathing and waterproofing layers are added to enhance durability. Installing the roof helps initiate the drying process, an essential step to prevent mold growth on wood.

Wall Framework and Exterior Elements

Walls provide support and enclose the structure, forming the building’s frame and supporting the roof. The wall framework uses studs, headers, and sheathing to create a sturdy skeleton. Insulation materials are incorporated to improve energy efficiency and indoor comfort.

Exterior elements like siding, brick, or stucco provide additional protection and aesthetic appeal. Walls must be level and plumb to align correctly with the roof structure. Inspections ensure the wall construction meets safety standards and building codes.

Construction Process and Material Selection

Choosing the right materials for your roof and walls and understanding their installation techniques is crucial in building a durable, efficient, and aesthetically pleasing structure. let us know it with Star Roofing Contractors.

Roofing Materials and Installation Techniques

Selecting roofing materials is a vital step in the construction process. Common choices include asphalt shingles, metal, tile, clay, and synthetic materials.

Asphalt shingles are popular due to their affordability and ease of installation. Meanwhile, metal roofs are known for their durability and resistance to elements, making them ideal for areas prone to severe weather.

Tile and clay roofs offer a classic look and excellent fire resistance, while synthetic options provide high durability with less weight.

Roof trusses, typically made of wood, support the roofing structure. Meanwhile, roof decking, another critical component, provides a solid base for the roofing materials and can be constructed from materials like plywood or oriented strand board (OSB).

Flashing is essential for waterproofing roof edges and joint areas to prevent leaks. Make sure to use proper installation techniques, suitable for your local climate and drainage requirements, to ensure the roof performs efficiently and lasts longer.

Wall Assembly and Interior Systems

Wall assembly involves choosing materials that contribute to the structural integrity and insulation of the building.

Brick, wood, and precast concrete are common choices.

For interior systems, techniques include installing drywall, applying paint or texture, and setting up plumbing, electrical, and HVAC systems.

Drywall installation forms the basis of interior wall finishing.

Choices in paint and texture affect the final appearance and can improve aesthetic appeal.

Proper placement of plumbing and electrical systems within walls ensures safety and functionality.

HVAC systems are integrated to maintain climate control.

Cabinetry, countertops, and flooring add the finishing touches, enhancing both functionality and design.

Each component, from wall materials to interior finishes, plays a critical role in creating a comprehensive and cohesive living environment.

How Much Does a New Roof Cost in Palm Coast Florida? Pricing Guide & Factors to Consider

In Palm Coast, FL, the cost of a new roof can vary significantly based on a number of factors, including the size of your home and the materials used.

For an average-sized home of around 2,000 square feet, you can expect to pay approximately $8,440 for a roof replacement.

A neighborhood with a variety of houses, some with new roofs and others in need of repair. The sun is shining, and the palm trees sway in the gentle breeze

Contractors like Star Roofing Contractors, typically charge between $4.50 and $8.00 per square foot, meaning larger or more complex roofs will cost more.

Additionally, if you opt for premium materials, such as metal or tile, your costs could increase.

Many homeowners in Palm Coast find their roofing costs range from $2,000 to $21,000.

Factors such as labor costs, old roof removal, and additional structural work can also influence the final price. This makes it essential to get detailed quotes and choose a reputable contractor.

Factors Influencing Roof Replacement Costs

When replacing a roof in Palm Coast, Florida, several factors can significantly affect the overall cost.

Key elements include the choice of roofing materials, labor costs, the scale of the project, and local regulations and permits.

Material Considerations

The type of roofing material you select will have a major impact on costs.

Asphalt shingles are the most common and budget-friendly option, ranging from $1.50 to $5.50 per square foot.

Metal roofs are more durable and energy-efficient, costing between $5.00 to $14.00 per square foot.

Higher-end materials like clay or concrete tiles can run from $10.00 to $30.00 per square foot, but they offer longevity and aesthetic appeal.

Each material has its benefits and downsides, influencing both the initial cost and long-term maintenance.

Labor Costs and Contractor Selection

Labor costs in Palm Coast can vary based on local labor rates and the expertise of the roofing contractors you hire.

High-quality, experienced contractors usually charge more but provide better workmanship.

Roofing contractors like Star Roofing Contractors, often estimate labor at 40-60% of the total replacement cost.

It’s crucial to get multiple quotes and check references.

A poorly installed roof might save money up front but can lead to higher expenses down the line due to repairs and a shorter lifespan.

Scope and Scale of Roof Work

The size and complexity of your roof also play significant roles in determining costs.

Roof size directly correlates with material and labor costs; larger roofs require more of both.

The roof pitch and design complexity can add to the labor involved, especially for steep or intricate roof systems.

Additionally, if your project involves replacing decking, rafters, or fascia boards, expect these elements to tack on extra expenses.

Older homes might need extensive work on the underlying structures, further impacting costs.

Permits and Regulations

In Palm Coast, you’ll need to secure appropriate permits, which adds to the roof replacement cost.

Permit fees can range from $200 to $500, depending on the scope of the project and local building codes.

Ensuring compliance with state and local regulations is crucial for avoiding fines and ensuring the safety and longevity of your new roof.

Some municipalities may have specific codes concerning hurricane-resistant roofing systems, which could also influence material and installation choices.

Additional Financial Considerations

When budgeting for a new roof in Palm Coast, Florida, there are several financial aspects to keep in mind beyond the initial cost.

These include potential savings through insurance, the long-term value of your investment, and hidden expenses that might arise.

Insurance and Warranties

Insurance can significantly impact the cost of a roof replacement.

Your homeowner’s insurance may cover part of the expenses, particularly if the damage is due to a covered event like a storm.

Check with your insurance provider to understand what is covered.

Warranties also play a crucial role.

A good warranty can cover future repairs and reduce long-term costs.

Most contractors offer manufacturer warranties on materials and workmanship warranties on the labor.

Ensure you understand the terms, duration, and what is covered.

Understanding the Hidden Costs

There are often hidden costs in a roof replacement project that can catch you off guard.

Labor costs can vary. This is especially true if the job requires specialized skills or extensive removal of the old roof.

Disposal of old materials is another expense to consider. Some contractors include this in their quotes, but it’s important to verify.

Your roof design can also affect costs. Homes with multiple stories, complex shapes, or special features such as chimneys may require more time and resources.

Make sure to factor in permits and local labor rates. These can differ significantly by region. Understanding these potential additional expenses upfront can help you budget more accurately for your roof replacement project.

Will Insurance Cover a 17 Year Old Roof in Florida? Understand Your Coverage Options

Determining whether your insurance will cover a 17-year-old roof in Florida involves understanding recent legislative changes.

Florida’s Senate Bill 2D, enacted in May 2022, plays a pivotal role in these decisions. Insurers in Florida are not allowed to deny coverage solely based on the age of a roof if it is under 15 years old.

A house with a 17-year-old roof in a sunny Florida setting, with palm trees and a blue sky. A worried homeowner holding an insurance policy document

For roofs over 15 years old, you don’t necessarily have to replace the roof to maintain insurance coverage.

Homeowners with roofs older than 15 years can have their roofs inspected and certified to possess at least five more years of useful life. This critical update ensures that even with older roofs, you can potentially avoid the costly expense of premature roof replacement.

Your 17-year-old roof may still be eligible for insurance, provided it passes the necessary inspection.

By staying informed about these updates, you can better navigate your options and ensure your home remains protected under Florida’s evolving insurance regulations. Let us understand more on these with Star Roofing West Palm Beach.

Understanding Homeowners Insurance Coverage in Florida

Homeowners insurance in Florida offers crucial financial protection for your property. Your policy typically covers various perils such as fire, hurricanes, and other natural disasters.

Each peril can significantly impact your home, making it essential to understand your coverage options.

Florida has specific requirements for homeowners insurance, particularly concerning roof age.

Insurance companies cannot deny coverage based on the age of a roof that is less than 15 years old. For roofs 15 years or older, you may need to conduct an inspection to verify its useful life before securing coverage.

Key Points:

  • Roof Age: Less than 15 years old: Coverage cannot be denied. Over 15 years old: Inspection required.
  • Premiums: Your insurance premiums may fluctuate based on factors like roof condition, home value, and location.
  • Insurance Agents: They can help you navigate your policy options and ensure you have adequate coverage.

Typical Coverages:

  1. Dwelling Coverage: Protects the structure of your home.
  2. Personal Property Coverage: Covers the replacement or repair of personal belongings.
  3. Liability Coverage: Shields you against lawsuits for property damage or injury that occurs on your property.
  4. Flood Insurance: Often a separate policy, crucial for flood-prone areas.

Coverage Types:

  • Actual Cash Value (ACV): Pays the depreciated value of your home or belongings.
  • Replacement Cost: Covers the full cost to replace your home or belongings without depreciation.

Useful Tips:

  • Regularly review your policy to ensure it meets your needs.
  • Work with your insurance agent to understand policy details.
  • Stay informed about any legislative changes affecting property insurance in Florida.

Ensure that you maintain your home and its roof to comply with your insurance policy requirements and maintain coverage.

Properly documented inspections and upkeep can lead to better insurance rates and fewer complications when filing claims.

Factors Influencing Roof Insurance for Older Homes in Florida

Insurance coverage for older roofs in Florida can be influenced by a variety of factors including the roof’s condition, specific legislation, and considerations related to insurance claims and replacement costs.

Roof Condition and Insurability

The condition of your roof is a significant factor in determining insurability.

Insurers will require a roof inspection to assess structural integrity, the extent of deterioration, and the useful life remaining.

Important aspects of the roof inspection include:

  • Shingle type: Asphalt shingles, metal roofs, gable roofs.
  • Structural components: Roof deck, overhang, shape.
  • Secondary water resistance: Ensures additional protection against leaks.

“A well-maintained roof can still be insurable even if it is older. An authorized inspector will evaluate if repairs or a complete roof replacement is necessary.” said David Spade of Star Roofing West Palm Beach.

Legislation and Roofing Requirements

New legislation such as Senate Bill 2D has been enacted to influence roof insurance policies in Florida.

Insurers cannot deny coverage based solely on roof age if it is under 15 years.

For roofs over 15 years, the Florida Building Code allows homeowners to undergo an inspection to certify that the roof has at least five more years of useful life.

These legislative changes aim to offer fairer coverage terms and help homeowners comply with updated roof requirements.

Insurance Claims and Roof Replacement Considerations

When filing an insurance claim for a roof over 15 years old, insurers assess the specific conditions of the roof and damage extent.

Key considerations include:

  • Hurricane and storm damage: Inspection for wind damage or secondary water resistance issues.
  • Repair costs vs. replacement costs: Evaluating labor, materials, and contractor quotes.
  • Depreciation and roof deductibles: How insurance policies account for the age and wear of the roof over time.

An insurance claim might result in either repair or full roof replacement. This is influenced by the extent and nature of the damage as well as legislative requirements set by the Florida Building Code.

Can I Call the Police on a PI? Legal Insights Explained

It’s a common question: Can you call the police on a private investigator?

In short, yes, you can. If you believe a private investigator is operating outside the bounds of the law or violating your rights, contacting law enforcement is a valid option.

A phone with a 911 dial and a worried expression

Private investigators must adhere to specific legal and ethical standards. They cannot wiretap your phone without consent, make arrests, or trespass on private property.

If a PI crosses these legal boundaries or engages in criminal activities, involving the police is not just your right but also a necessary measure to protect yourself.

State and federal laws regulate what private investigators can and cannot do. While they are often essential in gathering information for various clients, they must operate within the confines of the law.

If you suspect that a PI is breaking these laws, it’s crucial to take immediate action. Let us get to understand what PIs are with Ali Private Investigator Tampa.

Understanding the Role of Private Investigators

Private investigators play a crucial role in gathering information for individuals, businesses, and legal entities. Their activities are governed by strict legal guidelines to ensure they operate within the law.

Legal Scope and Limitations

Private investigators must adhere to local, state, and federal laws. They cannot trespass on private property or wiretap phones without consent.

They are also prohibited from accessing protected records, such as bank accounts and phone records. Violating these boundaries can result in severe penalties.

While surveillance is a common tactic, it must be conducted legally and without infringing on one’s privacy rights. Additionally, certain actions like impersonating law enforcement are strictly forbidden.

Hiring a Private Investigator: What to Know

When hiring a private investigator, verify that they are licensed and experienced in the necessary field.

A licensed private investigator must operate within the legal boundaries and ethical guidelines to safeguard your interests.

Discuss your requirements clearly, whether it is surveillance for infidelity, locating a missing person, or investigating insurance fraud.

Ensure the PI provides a detailed plan of action and respects confidentiality.

Your investigator should have clear communication policies and be transparent about costs and timelines.

Services Provided by PIs

Private investigators offer various services just like Ali Private Investigator Tampa.

Common services include surveillance, background checks, investigating criminal records, and locating missing individuals. They assist law enforcement by providing additional evidence that may be crucial for a case.

Surveillance is often employed in cases of suspected infidelity or insurance fraud.

Background checks are valuable in employment screening or personal matters, revealing criminal records and other pertinent information. Investigators must ensure their methods comply with relevant privacy and consent laws.

Experts in their field, private investigators bring specialized skills to help resolve complex issues legally and ethically.

When and How to Involve the Police

In certain situations, involving the police becomes essential when private investigators confront areas like crime, privacy violations, or illegal activities.

Clear communication between private investigators and law enforcement is crucial for effective collaboration.

Reporting Crimes and Trespassing

Private investigators may encounter criminal activities during an investigation.

If you witness a crime or see someone trespassing, it’s vital to contact the police immediately.

Private investigators are not law enforcement officials and do not have the authority to arrest suspects. Trespassing, property damage, or physical altercations should be reported to ensure appropriate action is taken.

Your attorney can provide guidance on how an investigator’s evidence can be presented to police to support a criminal case.

Privacy Violations and Illegal Activities

Privacy laws strictly prohibit certain activities during investigations.

If you suspect illegal wiretapping, unauthorized GPS tracking, or hacking, these are criminal actions that must be reported to the police.

Private investigators should avoid conducting surveillance that infringes on privacy rights.

Should you become aware of a private investigator violating privacy laws, informing law enforcement is warranted. Any form of fraud related to the investigation also falls under this category and necessitates legal intervention.

Collaboration Between Police and Private Investigators

Private investigators often need to work closely with police. This is to ensure legal compliance and leverage their efforts.

Reporting findings of illegal activities or privacy violations can help authorities take proper actions. This is without overstepping legal boundaries.

If your case involves complex scenarios requiring coordination, clear communication channels with law enforcement can ensure evidence is efficiently gathered and used.

Trust and cooperation between private investigators and police maximize investigative effectiveness. This also ensures public and private property rights are not compromised.

What is a Roof Drain Leader? Essential Function and Maintenance Tips

When managing roof drainage, one essential component stands out: the roof drain leader.

A roof drain leader, also known as a conductor head, is designed to funnel water from the roof to the downspout. This ensures proper water flow and prevents potential damage.

These leaders are crucial in effectively directing rainwater away from your building’s structure.

a roofer working on fixing drain pipes

Roof drain leaders come in various shapes and materials, each tailored to meet specific requirements of your roof drainage system.

Their primary role is to manage the water collected in gutters, delivering it smoothly into the downspouts. The downspouts then channel it safely to the ground.

Whether you’re overseeing maintenance for a commercial property or a residential one, understanding the function and importance of roof drain leaders can help you safeguard your building against water damage. Let us know more with Plumber Warragul.

Understanding Roof Drain Leaders

Roof drain leaders play a crucial role in managing rainwater from your roof. They prevent water damage, minimise leaks, and ensure proper water drainage. This helps to protect your building’s structure and maintain the integrity of your roofing system.

Functions and Importance

Roof drain leaders, often referred to as downspouts, channel rainwater from gutters away from your roof and building. This action prevents water from pooling, which can lead to ponding, leaks, and other damage.

Proper drainage is essential to avoid structural issues and water damage, especially during storms.

By efficiently guiding rainwater to the storm drain or designated drainage areas, you minimise the risk of water overflow and subsequent damage. Regular inspection and maintenance are key to ensuring they function effectively.

Types and Components

Several types of roof drain leaders exist, each suited to particular building designs and city requirements.

Common materials for leaders include aluminium, galvanized steel, and PVC, chosen for their durability and resistance to corrosion.

Types:

  • Standard downspouts: Typically vertical, these are used primarily with sloped roofs.
  • Scuppers: Openings in parapet walls of flat roofs, directing water to external leaders.
  • Overflow drains: Assist in managing excess water during heavy rainfall or drainage blockages.

Components:

  • Downspout: The vertical pipe guiding water to the ground or drainage system.
  • Leader head: Collects water from the gutter, reducing the risk of overflow.
  • Elbows and brackets: Used to navigate architectural features and secure the downspout.

Materials and Designs

Selecting the proper material for your roof drain leader is essential to longevity and performance.

Aluminium is popular for its lightweight nature and resistance to rust. Meanwhile, galvanized steel offers robust durability but may require periodic maintenance.

PVC, while not as strong, provides a cost-effective and corrosion-resistant alternative.

Designs:

  • Rectangular and round profiles: Depending on aesthetic and functional needs.
  • Decorative elements: Some designs include ornate finishes to match building exteriors.

Material and design choices should consider local building codes, weather conditions, and roof area size. Proper installation is crucial to ensuring efficient water flow and minimal maintenance issues, ultimately protecting your building from potential water damage.

Design and Installation Considerations

Proper design and installation of roof drain leaders are crucial for ensuring effective drainage and preventing potential damage to the structure.

Key considerations include calculating the drainage capacity, accurate placement and installation, and regular maintenance.

Determining Drainage Capacity

Calculating the drainage capacity involves several factors such as the roof area, expected rainfall intensity, and the slope of the roof.

You must ensure that your roof drain leaders can handle the volume of water. Refer to the International Plumbing Code and Appendix B for specific guidelines on rainfall rates and required number of drains per square metre.

A common approach is to install one primary drain and one secondary (overflow) drain per roofing bay. For commercial buildings, the drainage plan should factor in the larger surface area and potential for higher water volume.

Ensure the drain capacity matches the expected flow rate to avoid ponding water and structural damage.

Placement and Installation

Proper placement of roof drain leaders is essential for effective water diversion.

Each drain should be situated no more than 50 feet from the roof edge, with a spacing of 200 feet between drains.

Consider the roof slope and install drains in the lowest areas to prevent standing water.

Utilise tapered insulation and roof crickets to direct water to the drains.

Install adequate flashing around all roof penetrations like skylights, crickets, and parapets to prevent leaks.

For flat or low-slope roofs, peripheral and interior drainage systems can be effective. Ensure the drain pipes are connected securely to downspouts and gutters to channel water away from the foundation.

Maintenance and Longevity

Regular maintenance extends the lifespan of your roof drain leaders and the overall roofing system.

Inspect the drains periodically to remove debris and clear any blockages.

Clogged gutters and drains can lead to ponding water, promoting roof damage and soil erosion.

Check for signs of visible wear on components like strainers, pipes, and membranes.

Replace any worn or damaged parts promptly.

For commercial roofs, consider scheduling professional inspections like going to Plumber Warragul, to ensure complex systems remain functional.

Proper upkeep not only prevents immediate issues but also ensures longer-term drainage solutions and durability.

How to Tell if Your Hot Water System is Broken in Australia: Key Signs to Watch For

A reliable hot water system is essential for homeowners in Australia, ensuring you have hot showers and warm water whenever needed.

In Melbourne, recognising early signs of a failing system can save you from sudden inconveniences and costly repairs.

a broken water system under repair by a plumber

If you notice rusty-coloured water, strange noises like rumbling or banging, or a decrease in water temperature, these are clear indicators your hot water system might be broken.

Old age is another critical factor; once your system reaches 8 to 10 years, it might be time for a replacement.

Corrosion inside the tank, leading to dirty or smelly water, is another sign to look out for.

Maintaining the efficiency of your hot water system is crucial for consistent performance and avoiding unexpected breakdowns, especially in cooler climates.

Taking note of unusual symptoms like these can help you address potential problems before they escalate.

Dean Owens of Plumber Warragul has to say that regular checks and timely maintenance can significantly prolong the lifespan of your hot water system, ensuring a steady and efficient supply of hot water for your household.

Identifying Common Hot Water System Issues

It’s crucial for homeowners to recognise early warning signs of a failing hot water system.

Identifying issues such as leaks, faulty thermostats, and unusual noises can prevent further damage and ensure the longevity of your system.

Assessing for Leaks and Corrosion

Leaks, often found around the fittings or storage tank, signify potential corrosion.

You might notice water leaking around the base of the tank or rusty puddles, which are clear indicators of internal rust.

Regular inspections for moisture can prevent significant damage.

Check connections and joints for any signs of water leaking, and listen for hissing sounds that may indicate pressure or heat-related issues.

Detecting Faulty Thermostats and Heating Elements

A malfunctioning thermostat or heating element can result in lukewarm or cold water.

Adjust the thermostat and wait to see if the water heats up properly.

If the water heater still doesn’t perform correctly, it might be due to a failing heating element.

In electric systems, these components can be replaced relatively easily. Be sure to check the settings and replace parts if necessary to restore optimal performance.

Understanding Unusual Noises and Rusty Water Signs

Unusual noises such as rumbling, banging, or popping are common indicators of sediment build-up on the heating elements. This reduces efficiency and can damage the tank.

Flushing the tank regularly can mitigate this.

Additionally, rusty water coming from the taps suggests corrosion inside the tank, which could lead to leaks and degradation over time.

Rusty water is a significant warning sign that the system may need professional attention or replacement.

When and How to Arrange Repairs or Replacements

Ensuring your hot water system operates effectively is crucial.

Identifying when to repair or replace your system involves knowing the common signs of a failing unit and consulting with professionals to find the best solution.

Considering Repair Versus Replacement Options

Evaluating whether to repair or replace your hot water system depends on several factors.

Age is a primary consideration; systems over 10 years old often require replacement.

Frequent repairs and inefficiency also indicate the need for a new unit.

Different hot water systems, such as gas, electric, solar, and tankless, have varying lifespans and repair costs.

Reflect on the frequency of issues and long-term expenses before deciding.

Consulting with Professional Plumbers

Engaging a professional plumber like in Plumber Warragul, ensures accurate diagnosis and efficient service.

Experienced plumbers can assess whether a repair will suffice or if a replacement is necessary.

They can identify issues like sediment buildup, faulty heating elements, or leaks.

An expert plumber can recommend suitable options within your budget and install the system correctly, ensuring safety and compliance with local regulations.

Exploring Hot Water System Variants

Choosing the right hot water system involves considering performance, cost, and energy efficiency.

Gas hot water systems are known for quick heating and reliability. Meanwhile, electric systems are easy to install.

On the other hand, solar systems are environmentally friendly and can reduce energy bills, though they have a higher upfront cost.

Tankless systems provide hot water on demand and have lower operating costs. Meanwhile, heat pump systems are energy-efficient and suitable for warmer climates.

Evaluate these factors to find the best system for your needs.

Should Gutters Drain onto Roof? Understanding Proper Drainage Practices

Gutter cleaning Melbourne highlights that gutters are an essential component of your home’s drainage system, designed to direct rainwater away from your roof and foundation. When gutters drain directly onto a lower roof, it can seem like a simple and effective way to manage water flow from an upper roof. However, this practice can lead to potential issues such as water damage to the shingles and structural integrity of the lower roof.

a roofing with right guttering

You may find conflicting opinions among home inspectors and contractors regarding this method. Some consider it an “industry standard” while others argue against it due to the increased risk of damage.

Understanding the guidelines for gutter installation and maintenance can help you make informed decisions about your home’s drainage system and prevent long-term issues.

Connecting gutters with downspout extensions between floors can mitigate potential water damage by ensuring a consistent and controlled flow of water away from the roof and foundation. Following the basic rules of downspout installation, such as maintaining proper pitch and secure attachments, is crucial for effective water management and preserving the structural integrity of your home.

Implications of Incorrect Gutter Drainage

Improper gutter drainage can lead to significant problems for your property, affecting everything from the structural foundation to soil stability. The key implications include potential structural damage, risks of water intrusion, and effects on landscaping and soil.

Potential Structural Damage

Incorrect gutter drainage can undermine the structural integrity of your home. When water spills over or pools due to clogged or improperly directed gutters, it can seep into the foundation, weakening it over time.

This can lead to cracking and settling of the foundation, causing uneven floors and warped walls. Continuous exposure to water may also result in basement leaks, further compromising the structure. Ensuring your gutters direct water away from the house can prevent these severe issues.

Risk of Water Intrusion

Water intrusion is a critical consequence of poorly managed gutter systems. When gutters allow water to cascade down the sides of the house, it can penetrate the roofing materials, leading to roof leaks.

These leaks can cause significant water damage to your ceiling and walls, resulting in mould growth and decay. Basement leaks are another concern, as water can penetrate the basement walls through cracks or gaps, leading to flooding and damage to stored items. Proper gutter maintenance is essential to mitigate these risks.

Effects on Landscaping and Soil Stability

Poor gutter drainage affects your garden and the stability of the soil surrounding your home. Water overflowing from gutters can cause significant soil erosion, washing away topsoil and destabilising the ground.

This destabilisation can affect not just plants but also the integrity of walkways and driveways. Additionally, water pooling around your foundation can damage the landscape and surrounding patios. To maintain both aesthetics and functionality, gutters should be directed to drain away from your home’s base and landscaped areas.

Best Practices in Gutter and Downspout Installation

For effective gutter and downspout installation, it’s essential to choose the right system, position downspouts correctly, and perform regular maintenance to avoid issues like overflow and blockages. Detailed guidance on these practices can help you make informed decisions and ensure long-term functionality. You can also have gutter cleaning Melbourne do the work for a secure and quality installation.

Choosing the Right Gutter System

Selecting the proper gutter system is crucial. Materials such as aluminum, galvanised steel, and PVC are popular due to their durability and resistance to weather. Aluminium is lightweight and rust-resistant, making it a favourite among professionals.

Gutter size matters too. Standard sizes range from 5 to 6 inches to handle different water volumes. Larger sizes are better for areas with heavy rainfall.

Seamless gutters are preferred as they reduce the risk of leaks. These are custom-fit to your home’s dimensions and minimise joints, which are potential weak points.

Proper Placement of Downspouts and Extensions

Positioning downspouts correctly helps in effective water drainage. Downspouts should be placed at least every 35 feet along the gutter. Ensure they extend away from the foundation to prevent water damage.

Downspout extensions direct the flow of water further away from your home. These should be aimed towards a safe drainage area, such as a grassy lawn or a drainage pit.

Secure downspouts with hanging brackets to prevent sagging. These brackets should be placed every 4 feet along the downspout.

Maintenance to Prevent Overflow and Blockages

Regular maintenance is key to a functional gutter system.

Inspect gutters and downspouts at least twice a year, ideally in spring and autumn. Splitting this task into two seasons makes it easier to manage.

Clear out leaves, twigs, and other debris to prevent blockages.

Install gutter guards to reduce the frequency of cleaning. These guards catch debris while allowing water to flow through.

Check for signs of damage, such as cracks or rust, and address them promptly. If you notice water overflowing during heavy rain, this might indicate a blockage or an undersized gutter system.

What is the Difference Between Gutters and Downpipes? A Clear Explanation

When it comes to managing rainwater, understanding the roles of gutters and downpipes is crucial. Let us know and understand it with gutter cleaning Melbourne.

a guttering and downpipes

Gutters are the horizontal channels attached to the edge of your roof that collect rainwater and direct it towards downpipes.

Without gutters, rainwater would cascade directly off the roof, potentially causing significant erosion or damage to your home’s foundation.

Downpipes, on the other hand, are the vertical pipes that carry the rainwater from the gutters to the ground or a drainage system.

They are essential for ensuring that the collected water is efficiently directed away from your property, preventing water pooling and subsequent structural issues.

These components work in tandem to protect your property from water damage. By directing rainwater safely away, you maintain the integrity of your home’s foundation and landscaping. Ignoring either element can lead to costly repairs and maintenance issues down the line.

Understanding Gutters and Downpipes

Gutters and downpipes are crucial components of your stormwater drainage system. They work together to manage rainwater effectively, preventing damage to your home by directing water away from the foundation and roof.

Components and Functions

Gutters are long, horizontal troughs installed along the edge of your roof. They collect rainwater as it runs off the roof, preventing it from dripping directly to the ground where it could cause erosion or damage to your home’s foundation.

Downpipes are vertical pipes connected to the gutters. They channel the collected rainwater downward and direct it towards a drainage system or a soakwell located a couple of metres away from your property.

This helps to manage excess rainfall and prevent overflow.

Together, these components form a gutter system that ensures efficient rainwater management.

Proper installation and maintenance are essential to avoid clogged gutters and ineffective water diversion that could lead to leaks and structural issues. For any guttering works, just call gutter cleaning Melbourne.

Types and Profiles

Gutters come in various types and profiles to suit different aesthetic and functional needs:

  • Eaves gutters are traditional and commonly used for housing.
  • Box gutters are typically used for larger roofs and are built into the roof structure.
  • Valley gutters are installed where two roof sections meet, directing water to the main gutter system.
  • Square gutters offer a modern look and efficient water flow.
  • Round gutters provide a classic appearance and adequate water capacity.

Downpipes also vary in design and material. They can be round or rectangular and are usually made from durable materials like PVC or metal.

The choice of downpipe affects the system’s overall efficiency in handling rainfall.

Choosing the right types and profiles for your gutter system is essential for effective water management and complementing the architectural style of your home.

Installation and Regulations

Properly installing gutters and downpipes requires compliance with specific building codes and design considerations. This section covers key regulations and design factors that ensure effective performance.

Building Codes and Standards

In Australia, the Australian Building Codes Board (ABCB) sets the standard for gutter and downpipe installation through the National Construction Code (NCC).

The NCC 2022 requirements stipulate that gutters must be installed with brackets and securely fixed at corners and stop ends.

Meanwhile, overflows must be managed by ensuring a minimum 10 mm spacer between the gutter back and the fascia.

The AS/NZS 3500.3 and AS 1273 provide additional guidelines.

Downpipes should not serve more than 12 metres of gutter length each and should be located close to valley gutters.

Rainfall intensities and specific roof catchment areas also need to be calculated to determine the appropriate gutter and downpipe sizes.

Design Considerations for Performance

Overflow measures are crucial in gutter design. Gutters should have the capacity to handle specific rainfall intensities.

These intensities are calculated in litres per second per metre (L/s/m). The acceptable overflow capacity of 1.5 L/s/m must be adhered to, as per the ABCB housing provisions.

The installation of gutters should account for the roof catchment area. This is done by multiplying the length of the eave gutter by the distance between the ridge and the eave gutter.

This ensures that the system can handle maximum anticipated rainfall. The design must prioritize performance and durability.

To ensure long-lasting efficacy, the design should align with standards such as AS/NZS 2179.1.

Key considerations also include bracket spacing and securing. You also need to ensure gutters are installed below the top of the fascia for optimal overflow control.

This precision in design and adherence to regulations ensures robust drainage solutions.