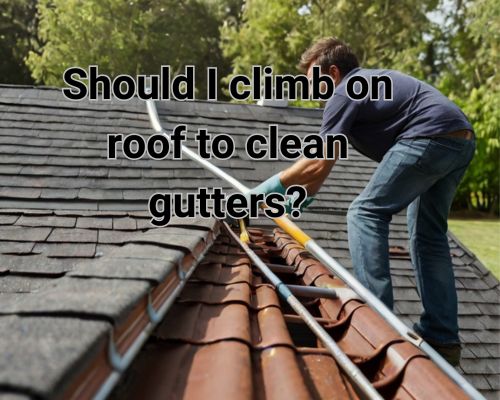
Should You Clean Gutters by Climbing on the Roof?

If you’re a homeowner, you know that cleaning your gutters is an essential task that should be done regularly. But when it comes to how to clean your gutters, you may be wondering if you should climb on the roof to do it.

man climbing up the roof for cleaning

While it may seem like the easiest and most efficient way to clean your gutters, climbing on the roof can be dangerous and risky.

When it comes to gutter cleaning, safety should always be your top priority. Climbing on the roof can put you at risk of falling, especially if you’re not experienced with using ladders or working at heights. In addition, walking on the roof can cause damage to your shingles, which can be costly to repair.

So, should you climb on the roof to clean gutters? The answer is no. There are safer and more effective ways to clean your gutters without putting yourself at risk. See Gutter Cleaning near me.

In this article, we’ll explore the risks of climbing on the roof, the importance of gutter cleaning, and alternative methods for cleaning your gutters.

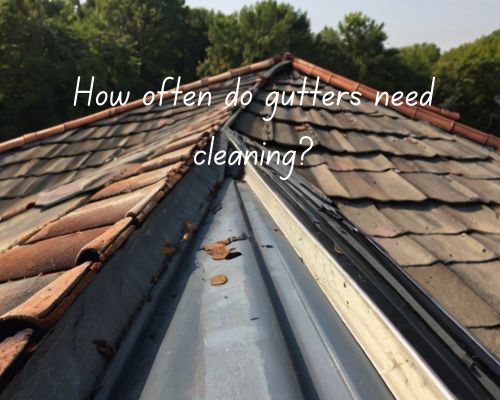
Assessing the Need for Gutter Cleaning

Regular gutter cleaning is essential to maintain the integrity of your home’s roofing system. Neglecting your gutters can lead to blockages, water damage, and sagging gutters, which can be costly to repair. In this section, we will discuss how to assess the need for gutter cleaning.

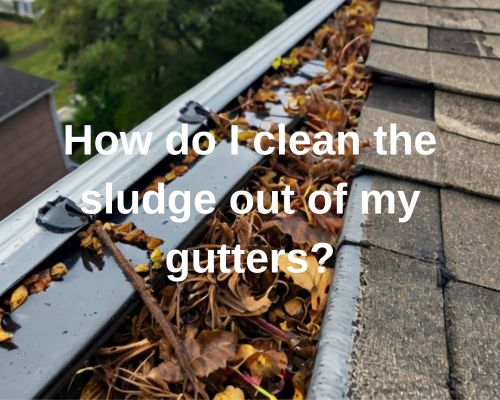
Identifying Blockages and Damage

The first step in assessing the need for gutter cleaning is to identify any blockages or damage. Blockages can occur due to debris, leaves, or other materials that accumulate in the gutters.

These blockages can prevent water from flowing through the gutters, leading to water damage and other issues.

Damage to gutters can occur due to storms, neglect, or other factors. It is essential to inspect your gutters regularly to identify any signs of damage such as cracks, holes, or sagging gutters.

If you notice any damage, it is crucial to repair or replace the gutters to prevent further damage.

Evaluating Gutter Condition and Maintenance

After identifying any blockages or damage, the next step is to evaluate the condition of the gutters and assess the need for maintenance.

If your gutters are relatively new and in good condition, you may only need to clean them twice a year. However, if your gutters are older or have been neglected, you may need to clean them more frequently.

Regular gutter maintenance is essential to prevent blockages and damage. This maintenance may include cleaning the gutters, removing debris, and checking for any signs of damage. For maintenance works, see Gutter Cleaning near me.

It is also important to ensure that your gutters are properly installed and functioning correctly to prevent blockages and water damage.

Executing Safe Gutter Cleaning

Choosing the Right Equipment

Before starting the gutter cleaning process, make sure you have all the necessary equipment.

Firstly, you will need a sturdy and reliable ladder. It is recommended to use a ladder stabilizer to prevent any accidents. Additionally, wearing PPE such as garden gloves and eye protection is essential to keep yourself safe while cleaning gutters.

There are various tools available for cleaning gutters, such as a gutter scoop, drain auger, leaf blower, and wet/dry vac. It is important to choose the right tool depending on the type of debris in the gutter.

For instance, a gutter scoop is ideal for removing leaves and twigs, while a drain auger can help clear any clogs in the downpipes.

If you do not have any tools or equipment, see for Gutter Cleaning near me.

Adhering to Safety Precautions

Gutter cleaning can be a risky task, and it is important to adhere to safety precautions to avoid any accidents.

Firstly, never walk on the roof to clean gutters as it can lead to roof damage and accidents. Instead, use a ladder to access the gutters.

When using a ladder, ensure that it is placed on a level and sturdy surface. Additionally, never lean the ladder against the gutters as it can cause damage. Always maintain three points of contact with the ladder, either two feet and one hand or two hands and one foot.

The Cleaning Process

Start by removing any large debris with a gutter scoop or by hand.

Once the debris is removed, flush the gutters with a garden hose to remove any remaining dirt and debris. If there are any clogs in the downpipes, use a drain auger to clear them.

If you have gutter guards installed, remove them before cleaning the gutters. After cleaning the gutters, reinstall the gutter guards to prevent debris from accumulating in the gutters.

If you are not comfortable performing gutter cleaning yourself, consider hiring professional gutter cleaners.

They have the necessary equipment and expertise to clean gutters safely and effectively. Professional gutter cleaning can also help identify any potential issues with the gutters, such as damage or the need for replacement.

Does Gutter Cleaning Include Downpipes? Explained by Experts

If you’re a homeowner, you know the importance of maintaining your property. One of the most critical aspects of home maintenance is gutter cleaning.

Gutters play a crucial role in directing rainwater away from your home’s foundation, preventing damage to your property. However, when it comes to gutter cleaning, many homeowners wonder if downpipes are included in the service.

a cleaned gutter and downpipes

The short answer is yes. When you hire a reliable and experienced gutter cleaner, downpipes should be included in the service.

Downpipes are a crucial component of your roof and gutter system, and it’s essential to ensure they’re functioning correctly. Clogs in downpipes can cause water to back up and overflow, potentially causing damage to your home’s foundation or even leading to flooding.

Therefore, it’s crucial to have a gutter cleaner like gutter cleaning Melbourne, who will clean your downpipes as part of their service.

If you’re in Australia, it’s essential to ensure that your gutter cleaner is familiar with the unique needs of Australian homes.

Australia can experience heavy rainfall, and gutters and downpipes need to be able to handle it. A professional gutter cleaner in Australia will understand the importance of cleaning your gutters and downpipes regularly to prevent damage to your home and property.

Understanding Gutter Cleaning

Gutter cleaning is an essential part of maintaining your home’s roof and drainage system. Over time, gutters can become clogged with debris such as leaves, twigs, and other organic matter.

This can lead to water damage, leaks, and even structural damage to your home. In this section, we will discuss what gutter cleaning involves, the importance of regular maintenance, and safety considerations to keep in mind.

What Does Gutter Cleaning Involve?

Gutter cleaning involves removing debris from your gutters and downpipes to ensure that water can flow freely and away from your home.

This can be done manually using a ladder, gloves, and a bucket, or with the help of a professional gutter cleaning service.

Some gutter cleaning services may also include cleaning and flushing your downpipes to ensure that they are free from blockages.

When cleaning your gutters, it is important to remove all debris, including small particles that can accumulate over time.

You can use a gutter scoop or a small trowel to remove debris by hand, or a leaf blower to blow out larger debris.

Once all debris has been removed, you can flush the gutters with water to ensure that they are completely clear.

Importance of Regular Gutter Maintenance

Regular gutter maintenance is important to prevent water damage to your home. Clogged gutters can cause water to overflow, leading to damage to your roof, walls, and foundation. Regular maintenance can also help to extend the life of your gutters and downpipes, saving you money in the long run.

It is recommended that you clean your gutters at least twice a year, in the spring and fall. However, if you live in an area with a lot of trees, you may need to clean your gutters more frequently.

If you are unable to clean your gutters yourself, it is recommended that you hire a professional gutter cleaning service like going to gutter cleaning Melbourne.

Safety Considerations in Gutter Cleaning

Gutter cleaning can be dangerous, especially if you are using a ladder to access your gutters. It is important to take safety precautions to prevent falls and injuries.

Always use a sturdy ladder and have someone hold the ladder while you work. Wear gloves to protect your hands from debris and use a safety harness if you are working on a high roof.

If you are unable to safely clean your gutters, it is recommended that you hire a professional gutter cleaning service. Professionals have the experience and equipment necessary to clean your gutters safely and efficiently.

In addition to regular gutter cleaning, you may also want to consider installing gutter guards.

Gutter guards can help to prevent debris from accumulating in your gutters, reducing the need for frequent cleaning. However, it is important to note that gutter guards are not a substitute for regular gutter maintenance.

Comprehensive Cleaning: Gutters and Downpipes

When it comes to maintaining a functional and modern gutter system, cleaning the gutters is only half of the job. Downpipes play a significant role in ensuring that your gutters function correctly, and neglecting them can lead to costly repairs and water damage. In this section, we will explore the importance of downpipes in effective gutter systems and techniques for cleaning and unblocking them.

The Role of Downpipes in Effective Gutter Systems

Downpipes are an essential component of gutter systems as they help to direct water away from the roof and walls of your home. They play a crucial role in preventing water damage, which can be costly to repair.

Without downpipes, water can accumulate in the gutters and cause blockages, leading to clogged gutters and potential fire hazards.

Techniques for Downpipe Cleaning and Unblocking

Cleaning out downpipes can be a challenging task, but it is essential to ensure that your gutters function correctly.

One technique is to use a hose with a high-pressure nozzle to flush out any build-up or debris. Another way is to use a bucket and a rake to scoop out any blockages.

However, it is crucial to be careful when using a ladder, especially if you are not comfortable with heights.

Identifying and Addressing Potential Issues

Routine checks of your downpipes are crucial to identify any potential issues before they become costly repairs.

Some potential issues include rust, leaks, and blockages.

If you notice any of these issues, address them promptly to prevent any further damage.

In some cases, downpipe cleaning may not be enough, and repairs or even replacement may be necessary.

Cleaning your gutters and downpipes is crucial to maintaining a functional and modern gutter system. Neglecting downpipes can lead to costly repairs and water damage.

By understanding the role of downpipes in effective gutter systems and using the right techniques for cleaning and unblocking them, you can prevent potential issues and ensure that your gutters function correctly.

How Often Do Gutters Need Cleaning? A Comprehensive Guide

Gutters are an essential part of your home’s drainage system. They need to be cleaned regularly to keep them functioning correctly, see gutter cleaning Melbourne. Neglecting your gutters can lead to a range of problems, including water damage, mold growth, and pest infestations.

a cleaned gutter

The answer is that it depends on a range of factors, including the type of gutters you have, the number of trees surrounding your home, and the amount of rainfall in your area. As a general rule, it’s recommended that you clean your gutters at least twice a year, ideally in the spring and fall. However, if you live in an area with a lot of trees, you may need to clean your gutters more frequently.

Regular gutter cleaning is essential for homeowners who want to protect their property and avoid costly repairs. While it may seem like a hassle, it’s a relatively simple task that can save you a lot of trouble in the long run.

In the following sections, we’ll take a closer look at why gutter cleaning is so important and how often you should be doing it.

Understanding Gutter Cleaning

Regular maintenance of your gutters is crucial to ensure they are working effectively and to prevent damage to your property. In this section, we will discuss the importance of regular maintenance, how to identify when your gutters need cleaning, and the consequences of neglected gutters.

Importance of Regular Maintenance

It is recommended that you clean your gutters at least twice a year, once in the spring and once in the fall. However, if you live in an area with a lot of trees or heavy rainfall, you may need to clean your gutters more frequently. Regular maintenance will prevent debris such as leaves, twigs, and other materials from clogging your gutters, which can cause water to overflow and damage your property.

Regular maintenance of your gutters will also help to prevent leaks and water damage to your home. Clogged gutters can cause water to seep into your roof, walls, and foundation, leading to rot, mold, and structural damage. In addition, neglected gutters can attract pests such as rodents and insects, which can cause health and safety concerns.

Identifying When Gutters Need Cleaning

It is important to be able to identify when your gutters need cleaning. Signs that your gutters may be clogged include water overflowing from your gutters, water damage to your walls or foundation, and visible debris such as leaves and twigs in your gutters. If you notice any of these signs, it is important to clean your gutters as soon as possible to prevent further damage.

Consequences of Neglected Gutters

Neglecting to clean your gutters can have serious consequences for your property. Clogged gutters can cause water to overflow and damage your roof, walls, and foundation. This can lead to costly repairs and even structural damage to your home. In addition, neglected gutters can attract pests such as rodents and insects, which can cause health and safety concerns.

Practical Aspects of Gutter Maintenance

Determining Cleaning Frequency

Cleaning your gutters is an important aspect of home maintenance. To keep your gutters in good condition, it is recommended to clean them at least twice a year, preferably in spring and fall. However, if you live in an area with a lot of trees, you may need to clean them more often to prevent debris buildup.

Professional Gutter Cleaning Services

If you are unable to clean your gutters yourself, or if you don’t feel comfortable doing so, you may want to consider hiring a professional gutter cleaning service, see gutter cleaning Melbourne. Professional cleaners have the necessary equipment and expertise to clean your gutters safely and efficiently. They also have insurance to protect you in case of any accidents or damage.

When choosing a professional gutter cleaning service, make sure to get a quote and check their insurance and credentials. The cost of gutter cleaning services can vary depending on the size of your home and the extent of the cleaning required.

DIY Gutter Cleaning Tips

If you decide to clean your gutters yourself, there are a few things to keep in mind to ensure your safety and the effectiveness of the cleaning.

First, make sure to wear protective clothing, such as gloves and goggles, to protect yourself from debris and other hazards.

Second, use a sturdy ladder and make sure it is placed on a flat surface. Avoid leaning the ladder against the gutters themselves, as this can cause damage. It’s also a good idea to have someone hold the ladder steady while you work.

Third, use a gutter scoop or a small garden trowel to remove debris from the gutters. Place the debris in a bucket or on a tarp to make cleanup easier.

Finally, use a garden hose to flush out the gutters and check for any leaks or damage.

If you want to reduce the need for frequent gutter cleaning, you may want to consider installing gutter guards. These can help prevent debris buildup and make cleaning easier in the long run.

Overall, gutter maintenance is an important aspect of home care. Whether you choose to clean your gutters yourself or hire a professional, make sure to do so regularly to prevent water damage and other issues.

How to Clean Sludge Out of Your Gutters: A Step-by-Step Guide

When it comes to home maintenance, cleaning your gutters is an essential task that should not be overlooked. Neglecting your gutters can lead to a buildup of debris and sludge. This buildup can cause serious damage to your home, see Gutter Cleaning near me.

a roof gutter that needs cleaning

If you’re wondering how to clean the sludge out of your gutters, don’t worry – it’s not as difficult as you might think.

First and foremost, it’s important to prioritize safety when cleaning your gutters. Make sure you have a sturdy ladder and wear gloves to protect your hands from sharp objects and bacteria.

Once you’re ready to begin, start by removing any large debris from your gutters using a trowel or scoop. Then, flush out the remaining sludge and smaller debris with a hose.

For stubborn buildup, you can mix equal parts water and vinegar. Then, pour it down the gutters to help break up the sludge.

Regular gutter cleaning can help prevent damage to your home and save you money in the long run. By taking the time to clean the sludge out of your gutters, you can ensure that rainwater flows freely. This will help prevent any damage to your roof or foundation.

With the right tools and safety precautions, gutter cleaning can be a simple and straightforward task that you can easily tackle on your own.

Preparing for Gutter Cleaning

Before you start cleaning your gutters, it is important to take some safety measures and gather the necessary tools. This will help ensure that the cleaning process is safe and efficient.

Safety Measures

Cleaning gutters can be a risky task, so it is important to take the necessary safety measures. Here are some tips to keep in mind:

  • Always use a sturdy ladder that is tall enough to reach the gutters. Make sure the ladder is placed on a flat and stable surface.
  • Wear work gloves to protect your hands from sharp debris and sludge buildup.
  • Consider using safety glasses to protect your eyes from debris that may fly out of the gutters.
  • Use a ladder stabilizer to prevent the ladder from shifting or wobbling.

Gathering Necessary Tools

To clean the sludge out of your gutters, you will need the following tools:

  • Gutter scoop: This tool will help you remove debris from the gutters and prevent clogs.
  • Bucket: Use a bucket to collect debris and sludge as you clean the gutters.
  • Garden hose: A garden hose with a spray nozzle attachment can be used to flush out the gutters and downspouts.
  • Pressure washer: If your gutters are heavily clogged, a pressure washer can be used to blast away debris and sludge buildup.

Make sure you have all the necessary tools before you start cleaning your gutters or you may see Gutter Cleaning near me. This will help ensure that the process is efficient and effective.

Step-by-Step Gutter Cleaning Process

Cleaning your gutters is an important task that should be done at least twice a year to prevent water damage to your home’s foundation. Here’s a step-by-step guide to help you clean your gutters like a pro.

Removing Leaves and Debris

The first step in cleaning your gutters is to remove any leaves, twigs, and other debris that may have accumulated. You can use a scoop or trowel to remove the debris and place it in a bucket or on a tarp for easy disposal.

Be sure to wear gloves to protect your hands from any sharp objects or bacteria.

Flushing Out the Gutters

After removing the debris, it’s time to flush out the gutters. Use a hose to spray water into the gutters and downspouts to remove any remaining debris or sludge.

If you notice any blockage in the downspouts, you can use a plumber’s snake or a pressure washer to clear it out.

Inspecting and Addressing Damage

Once you’ve flushed out the gutters, it’s time to inspect them for any damage.

Look for signs of rot, rust, cracks, or any other damage that may need to be addressed.

If you notice any damage, be sure to repair or replace the damaged section. This will prevent water damage to your home’s foundation.

Are Seamless Gutters Worth It? Pros and Cons to Consider

When it comes to maintaining your home, gutters are an essential component that should not be overlooked.

“Seamless gutters are a popular option for homeowners due to their durability and aesthetic appeal. However, before investing in seamless gutters, it’s important to consider whether they are worth the cost.” said Mike Owen of Gutters Of West Palm Beach.

A house with seamless gutters, water flowing smoothly, no leaks or clogs, surrounded by lush greenery

Seamless gutters are custom-fit gutters that lack the sectional joints of traditional gutters. They are made on-site to match the specifications of your home, resulting in a more precise fit and a cleaner look.

While seamless gutters are more expensive than traditional gutters, they offer several benefits that may make them worth the investment.

One advantage of seamless gutters is that they are less likely to leak.

With traditional gutters, the joints between each section can become loose over time, causing water to seep through and damage your home’s foundation.

Seamless gutters eliminate this issue, as they are made from a single piece of material that is custom-fit to your home. Additionally, seamless gutters require less maintenance than traditional gutters, as there are no joints that can become clogged with debris.

Benefits and Drawbacks of Seamless Gutters

Durability and Performance

Seamless gutters are known for their durability and performance.

Unlike traditional gutters, seamless gutters are made from one continuous piece of material, which means there are no seams or joints that can weaken over time and lead to leaks or clogs. This makes them less prone to water damage and requires less maintenance in the long run.

In addition, seamless gutters are often made from high-quality materials, such as aluminum, copper, or steel, which further enhances their durability and performance.

These materials are resistant to rust and corrosion, ensuring that your gutters will last for many years without needing to be replaced.

Aesthetic Appeal and Home Value

Seamless gutters are also known for their aesthetic appeal and can add value to your home.

They come in a variety of colors and styles to match any home’s exterior and can be custom-fit to your home’s specific measurements. This creates a sleek and seamless look that enhances your home’s curb appeal and overall aesthetic.

Additionally, seamless gutters can increase your home’s value by providing a long-lasting and low-maintenance solution for protecting your home from water damage. This is especially important for potential buyers who are looking for a home that is well-maintained and has a high level of curb appeal.

Cost Considerations

While seamless gutters have many benefits, they do come with a higher upfront cost compared to traditional gutters.

This is due to the custom-fit design and labor costs associated with installation. However, the long-term benefits of seamless gutters often outweigh the initial cost, as they require less maintenance and are less prone to leaks and clogs.

When considering the cost of seamless gutters, it is important to factor in the cost of materials, labor, and any additional features such as gutter guards.

The material you choose will also impact the cost, with aluminum and vinyl being the most affordable options and copper and steel being more expensive.

Choosing the Right Gutter System for Your Home

When it comes to selecting the right gutter system for your home, there are several factors to consider.

Material and style options, as well as installation and maintenance, are some of the key factors to keep in mind.

Material and Style Options

Gutters come in a variety of materials, including aluminum, copper, steel, and vinyl.

Each material has its own pros and cons, so it’s important to choose one that suits your needs and budget.

In terms of style, there are two main types of gutters: k-style and half-round.

K-style gutters are more common and have a flat bottom and back, while half-round gutters have a rounded shape. The style you choose will depend on your personal preferences and the style of your home.

Installation and Maintenance

When it comes to installation, you have two options: professional installation or DIY installation. DIY installation may seem like a cost-effective option, but improper installation can lead to leaks and other issues. Professional installation like what Gutters Of West Palm Beach does, ensures that your gutters are installed correctly and can save you money in the long run.

Maintenance is also an important factor to consider. Traditional gutters require regular cleaning to prevent clogs and other issues. Meanwhile, seamless gutter systems and gutter guards, such as LeafFilter, can help reduce the need for cleaning. However, no gutter system is completely maintenance-free.

What Is the Difference Between a Gutter and an Eaves Trough? A Clear Explanation

If you’re a homeowner, you’ve probably heard the terms “gutter” and “eaves trough” used interchangeably. While they both serve the same purpose of directing water away from your home’s foundation, there are some differences between the two.

A gutter is a narrow channel attached to the edge of a roof, while an eaves trough is a wider, more shallow trough that also collects rainwater

“The main difference between gutters and eaves troughs is their location. Gutters are typically attached to the fascia board, which is the board that runs along the lower edge of the roof. Eaves troughs, on the other hand, are attached to the eaves, which is the part of the roof that overhangs the exterior walls of your home.” said Mike Owen of Gutters Of West Palm Beach.

Another difference between the two is their size. Eaves troughs are typically larger than gutters, as they need to handle a greater volume of water. They also tend to be more visible than gutters, as they are located closer to eye level.

Understanding Gutters and Eavestroughs

Definition and Functionality

Gutters and eavestroughs are an essential part of any roofing system. They are designed to collect rainwater and channel it away from the roofline and exterior of your home. These metal or plastic channels are installed along the edge of the roofline and are connected to a drainage system that directs water flow away from the foundation of your home.

Components and Installation

Gutters and eavestroughs are made from a variety of materials including aluminum, steel, plastic, vinyl, and copper. The type of gutter you choose will depend on your budget, the size of your home, and the regional climate.

Seamless gutters are a popular choice because they are custom-made to fit your home and require less maintenance.

The installation process for gutters and eavestroughs involves attaching the channels to the fascia board or roofline using brackets and hangers. Downspouts are then installed to direct water flow away from the home’s foundation. For quality installer, you may go to Gutters Of West Palm Beach.

Design Variations

There are several types of gutters and eavestroughs available, including k-style gutters, fascia gutters, vinyl gutters, and copper gutters.

K-style gutters are the most common type of gutter and are designed to resemble crown molding. Fascia gutters are attached directly to the fascia board and are a popular choice for homes with little to no roof overhang.

Vinyl gutters are lightweight and easy to install, while copper gutters are durable and offer a unique aesthetic appeal.

Comparing Differences and Practical Considerations

Geographical Preferences

When choosing between gutters and eaves troughs, your geographical location plays a significant role. In Canada, eaves troughs are more commonly used, while in the United States, gutters are the norm.

However, regional preferences may vary, and it’s essential to consider the climate and weather patterns of your area before making a decision. For example, if you live in an area with heavy rainfall or snow, gutters may be a better choice as they can handle more water runoff.

Maintenance and Durability

Both gutters and eaves troughs require regular maintenance to function correctly. Regular cleaning is necessary to prevent debris, twigs, and leaves from clogging the system, which can lead to potential water damage to your foundation, basement, siding, and even mold and mildew growth.

However, sectional gutters are easier to clean and maintain than eaves troughs. In terms of durability, gutters tend to be more secure and have better structural integrity than eaves troughs.

Impact on Property

The design, cost, and location of your house are essential factors to consider when choosing between gutters and eaves troughs.

Gutters tend to have a more functional, rectangular design and are more aesthetically pleasing than eaves troughs. They also come in a variety of materials, such as aluminum, copper, and vinyl, which can affect the cost of installation.

On the other hand, eaves troughs are often installed with soffit and fascia, which can enhance the curb appeal of your property. Additionally, the installation cost of eaves troughs is often lower than that of gutters.

In terms of the impact on your property, gutters can help prevent soil erosion and protect your landscaping by directing water away from the drip line. They can also prevent damage to your sewer system and reduce the potential for water damage to your foundation.

Eaves troughs, on the other hand, can store more water and are better suited for areas with lower rainfall.

Benefits of Downpipes

Both gutters and eaves troughs require downpipes to direct water away from your property. Downpipes are an essential component of any drainage system, and they can prevent water from pooling around your property, which can cause damage to the foundation and basement.

However, gutters tend to have a more significant number of downpipes, which can enhance their functionality and effectiveness.

Regular Maintenance and Cleaning

Regular maintenance and cleaning are necessary for both gutters and eaves troughs to function correctly.

Debris, leaves, and twigs can clog the system. This can lead to potential water damage to your foundation and basement.

It’s essential to clean your gutters or eaves troughs at least twice a year. It’s best to do this in the spring and autumn.

Both gutters and eaves troughs have their advantages and disadvantages. When choosing between the two, consider your geographical location, climate, and weather patterns. Also, consider the design, cost, and location of your property.

Can You Install a Kaboodle Kitchen Yourself? A Comprehensive Guide

Mornington cabinet maker may say “Installing a new kitchen can be a daunting task, but with the right tools and knowledge, it can be a rewarding DIY project. Kaboodle kitchens are a popular choice for those who want to install their own kitchen, as they are designed with the DIYer in mind.”

kaboodle kitchen installed

If you’re wondering whether you can install a Kaboodle kitchen yourself, the answer is yes, you can!

Kaboodle kitchens are designed to be easy to install, with a range of cabinets, benchtops, and accessories that can be mixed and matched to create a custom kitchen. The company provides detailed instructions and videos that guide you through the installation process, making it easy to follow along. Plus, if you get stuck, you can always contact their customer service team for help.

One of the benefits of installing a Kaboodle kitchen yourself is that it can save you money. By doing the work yourself, you can avoid paying for labour costs, which can be a significant expense when installing a new kitchen. Plus, you’ll have the satisfaction of knowing that you did it yourself.

So, if you’re up for the challenge, installing a Kaboodle kitchen can be a great DIY project that will add value to your home.

Planning Your Kaboodle Kitchen Installation

When it comes to installing your kaboodle kitchen, planning is key. This section will guide you through the essential steps to ensure a successful installation of your new kitchen.

Design and Inspiration

Before you start measuring and ordering your kaboodle kitchen, it’s important to have a clear idea of the design and style you want to achieve.

Browse through our range of design and inspiration ideas to help you find the perfect look for your kitchen renovation project.

You can also use our 3D planner to visualise your ideas and customise your kitchen to suit your style and needs.

Measuring and Ordering

Once you have a clear idea of your kitchen design, it’s time to measure your space and order your kaboodle kitchen.

Use our measuring guide to ensure accurate measurements and avoid any costly mistakes.

You can order your kaboodle kitchen online or visit your nearest Bunnings store to speak to our kitchen experts and place your order.

Budgeting and Costs

Kaboodle kitchens are designed to be affordable without compromising on quality. Our modular design allows you to customise your kitchen to suit your budget and needs.

Use our price guide to estimate the cost of your kitchen project and create a budget that works for you.

Don’t forget to factor in the cost of installation if you’re not planning to install your kitchen yourself.

Executing the Installation

Congratulations, you have successfully planned and designed your new kaboodle kitchen. Now it’s time to execute the installation. With the right tools, preparation, and attention to detail, you can install your kaboodle kitchen yourself. It is also better to seek for professional help like in Mornington cabinet maker.

Assembling Cabinets and Components

Before you start assembling your cabinets and components, make sure you have all the necessary hardware and tools.

You can find a list of required tools in the kaboodle installation guide.

Once you have everything you need, you can start assembling your cabinets and components.

Follow the instructions provided in the kaboodle installation guide carefully. Make sure you assemble each cabinet and component correctly.

If you need any assistance, you can contact the kaboodle support team or consult a Bunnings kitchen expert.

Installation Process

Now that you have assembled your cabinets and components, it’s time to install them.

You can hire a qualified tradesperson to install your kitchen for you, or you can install it yourself.

If you choose to install it yourself, make sure you follow the instructions provided in the kaboodle installation guide.

The installation process involves installing the cabinets, benchtops, handles, panels, and hardware.

Make sure you have all the necessary tools and hardware before you start. You may need to hire a qualified tradesperson for gas and plumbing connections.

Finishing Touches

Once you have installed your cabinets and components, it’s time to add the finishing touches. This includes installing the doors, shelf, shelving, and filler panels.

Make sure you follow the instructions provided in the kaboodle installation guide carefully.

The ease of installation of your kaboodle kitchen depends on your level of experience and skill. If you are not confident in your ability to install your kitchen, you can hire a local installer for peace of mind.

Installing a kaboodle kitchen yourself is possible with the right tools, preparation, and attention to detail. If you need any assistance, you can contact the kaboodle support team or consult a Bunnings kitchen expert.

Are White Cabinets Cheaper Than Wood? Exploring the Cost Differences

If you’re planning a kitchen renovation or remodel, one of the most significant decisions you’ll have to make is choosing the right cabinets. Cabinets make up a significant portion of your kitchen, so it’s essential to choose a style that fits your design and budget, see cabinet maker in Mornington for kitchen and bathroom cabinets for more.

wood cabinets

When it comes to cabinet materials, wood and white cabinets are two popular options that you might consider.

One of the most common questions people ask when choosing cabinets is whether white cabinets are cheaper than wood cabinets. The answer is not straightforward, as it depends on several factors, including the quality of the wood, the style of cabinets, and the finish you choose.

While white cabinets are generally less expensive than custom wood cabinets, you can find high-quality wood cabinets that are less expensive than some white cabinets. Additionally, the cost of painting or staining wood cabinets can add up, making them more expensive than pre-painted white cabinets.

Comparing Cabinet Materials and Costs

When it comes to kitchen cabinets, there are several materials to choose from, each with its own set of pros and cons. In this section, we’ll compare the most popular cabinet materials and discuss their cost differences.

Material Differences: Wood vs MDF vs Thermofoil

Wood cabinets are a classic choice for kitchen cabinets, offering a natural grain and warmth that can’t be replicated by other materials. However, they tend to be more expensive due to the cost of the materials and the labor involved in the manufacturing process.

Certain types of wood, such as cherry or walnut, may come at a higher price compared to white cabinets made from materials like laminate or thermofoil.

MDF (medium-density fiberboard) is a budget-friendly alternative to solid wood. It’s made by compressing wood fibers and resin under high pressure, resulting in a dense, smooth surface that’s ideal for painting. MDF is a popular choice for painted cabinets, as it doesn’t have a natural grain to show through the paint.

Thermofoil is another budget-friendly option that’s made by fusing a thin layer of vinyl onto an MDF core. Thermofoil cabinets are available in a wide range of colors and finishes, including white, and can be made to mimic the look of wood or other materials.

Price Factors in Cabinet Manufacturing

The cost of manufacturing cabinets depends on several factors, including the materials used, workmanship, and craftsmanship. Solid wood cabinets require more labor and skill to manufacture than MDF or thermofoil cabinets, which can drive up the cost. Additionally, the type of finish and paint color can impact the price of the cabinets. For a quality product, it is better to seek for professional workers, see cabinet maker in Mornington for kitchen and bathroom cabinets.

The Impact of Finish and Color on Price

The finish and color of your cabinets can also impact the price. Stained wood cabinets tend to be more expensive than painted cabinets, as they require more time and skill to produce. Additionally, certain paint colors, such as white, may be more budget-friendly than other colors due to their popularity and ease of touch-up.

Design Considerations and Kitchen Aesthetics

Trends and Timelessness in Kitchen Design

When it comes to kitchen design, trends come and go, but some styles remain timeless. White cabinets are a classic choice that can fit into any kitchen design, from modern to farmhouse. They are versatile and can be paired with almost any countertop and backsplash. White cabinets also give the illusion of a larger space, making them an excellent option for smaller kitchens.

While white cabinets are timeless, it’s essential to balance trends with your needs and showcase your kitchen’s character and personality. If you’re remodeling your kitchen, consider incorporating modern hardware for a sleek and updated look. However, don’t sacrifice functionality for style. Your kitchen needs to be practical and meet your daily needs.

Choosing Cabinets That Complement Your Kitchen

When choosing cabinets, consider the overall style of your kitchen. If you have a farmhouse-style kitchen, consider cabinets with texture and grain marks to add warmth and character. If you have a more modern kitchen, sleek cabinets with clean lines and minimal hardware may be the way to go.

Another factor to consider is wood tones. If you have wood flooring or other wood elements in your kitchen, consider cabinets that complement those tones. For example, if you have dark wood floors, lighter cabinets can create a beautiful contrast.

Hardware and Accessories: The Finishing Touches

Hardware and accessories are the finishing touches that can tie your kitchen’s design together.

When choosing hardware, consider the style of your cabinets and the overall design of your kitchen.

Modern hardware can add an updated touch, while traditional hardware can enhance the timeless look of white cabinets.

In addition to hardware, consider adding accessories that showcase your kitchen’s personality.

For example, if you love to cook, add a pot rack or open shelving to display your cookware. If you have a collection of vintage dishes, consider incorporating them into your kitchen design.

When designing your kitchen, consider the balance between trends and timelessness. White cabinets are a classic choice that can fit into any kitchen design.

When choosing cabinets, consider the overall style of your kitchen, including wood tones and texture.

Finally, don’t forget the finishing touches, such as hardware and accessories, which can showcase your kitchen’s personality.

How to Spot a Roofing Scam: Signs to Look Out For

When it comes to roofing projects, hiring a reputable contractor is crucial. Unfortunately, some unscrupulous individuals will try to scam you out of your hard-earned money.

a hardworking roofer

So how can you tell if a roofer is scamming you? Here are some tips to help you avoid roofing scams and find a trustworthy contractor.

First and foremost, be wary of any contractor who demands payment upfront. Reputable contractors will typically only require a deposit or progress payments as the work is completed.

If a roofer insists on being paid in full before starting the job, it could be a red flag that they’re trying to scam you.

Another warning sign to watch out for is high-pressure sales tactics. If a contractor pressures you to sign a contract or letter of intent right away, it could be a sign that they’re trying to take advantage of you.

A reputable contractor like Commercial Roofing NJ, will give you the time and space you need to make an informed decision.

Identifying Common Roofing Scams

When it comes to roofing scams, there are several tactics that scammers use. Here are some of the most common roofing scams to watch out for:

Storm Chaser Operations

After major storms, scammers often go door-to-door claiming to be roofing contractors. They may offer to inspect your roof for free and claim that your insurance will cover the cost of repairs.

However, these storm chasers may not be licensed or insured, and they may not have your best interests in mind. Always check the credentials of any contractor who approaches you after a storm.

Unnecessary Repairs and Mystery Damage

Some roofing scammers may suggest that you need more repairs than you actually do, or they may claim that there is damage to your roof that doesn’t exist. They may even create fake damage to convince you to hire them for repairs.

Be sure to get a second opinion from a reputable contractor if you are unsure about the extent of the damage to your roof.

High-Pressure Sales and No-Cost Incentives

Some scammers may use high-pressure sales tactics to convince you to sign a contract quickly. They may also offer no-cost incentives, such as a free roof inspection or a free upgrade to premium shingles, to entice you to hire them.

“Be wary of any contractor who tries to pressure you into signing a contract or who offers incentives that seem too good to be true.” said Charles Jimerson of Commercial Roofing NJ.

Large Down Payments and Full Payment Upfront

Some scammers may ask for a large down payment before starting work on your roof, or they may ask for full payment upfront. They may claim that this is necessary to cover the cost of materials or to secure their services.

However, reputable contractors typically do not require large down payments or full payment upfront. Be sure to read the contract carefully before signing and never pay for the entire project upfront.

Ensuring Credibility and Professionalism

When it comes to hiring a roofer, ensuring their credibility and professionalism is crucial to avoid being scammed. Here are some steps you can take to ensure that you are working with a trustworthy and competent roofer.

Verifying License and Insurance

Before hiring a roofer, it is important to verify that they are licensed and insured. Ask the roofer directly for their license number and the name under which the license is registered.

Legitimate and professional roofers should have no problem providing this information. You can also check with your state’s licensing board to confirm the information.

In addition to verifying the license, it is also important to ensure that the roofer has insurance. This will protect you from any liability in case of accidents or damages during the roofing project.

You can ask for proof of insurance and verify it with the insurance company.

Be aware of insurance fraud and scams. Check with the National Insurance Crime Bureau to see if the roofer has any history of fraud or scams.

Assessing Workmanship and Materials

Assessing the quality of workmanship and materials is another important step in ensuring that you are working with a professional and competent roofer.

You can ask for samples of roofing materials and check their quality and durability. You can also ask for references from previous clients and check the quality of their work.

Checking References and Online Reviews

Checking references and online reviews is an important step to ensure that the roofer has a good reputation and satisfied customers.

You can ask for references from the roofer and contact them to ask about their experience. You can also check online reviews on websites such as the Better Business Bureau and Google Reviews.

Understanding Contract and Payment Terms

Before hiring a roofer, split the text up into at most two sentences per paragraph.

Make sure that the contract includes all the details of the project. These details include the scope of work, materials, timeline, and payment terms. Be wary of contractors who ask for a large down payment or cash payment.

It is also important to understand your insurance and references. Make sure that the roofer is aware of your insurance deductible. Also, make sure that they provide you with all the necessary information to file a claim. If you are unsure about any aspect of the project, consider getting a second opinion from an attorney or another roofer.

Do You Need a Permit to Replace Your Roof in New Jersey?

If you are a homeowner in New Jersey and planning to replace your roof, you may be wondering whether you need a permit to do so. The answer is not straightforward, as it depends on several factors.

worker doing roof replacement

One of these factors is the type of work you are planning to do. Another factor is the local building codes and regulations in your area.

In general, if you are planning to do a complete roof replacement, you will likely need a permit from your local building department. This is because roof replacement is considered a major construction project that may affect the structural integrity of your home and the safety of its occupants.

However, if you are only planning to do minor repairs or maintenance, such as fixing a leak or replacing a few damaged shingles, you may not need a permit.

It is always best to check with your local building department to verify whether a permit is required for your specific project.” said Charles Jimerson of Commercial Roofing NJ.

Keep in mind that obtaining a permit for your roof replacement project can help ensure that the work is done safely and up to code. It can also protect you from potential liability issues if something goes wrong during or after the project.

Therefore, it is always a good idea to consult with a licensed and experienced roofing contractor who can guide you through the permit process and ensure that your project is completed successfully.

Permit Requirements for Roof Replacement in New Jersey

If you are planning to replace your roof in New Jersey, you may be wondering whether you need a permit or not. Here is what you need to know about the permit requirements for roof replacement in New Jersey.

Understanding New Jersey Building Codes

New Jersey has a set of building codes that regulate construction and renovation work in the state. These codes are designed to ensure that all construction work is safe, durable, and meets the minimum standards of quality.

The Department of Community Affairs (DCA) is responsible for enforcing these codes.

Types of Roof Work and Permit Necessity

In March 2018, the DCA reclassified roof replacements as minor work and ordinary maintenance. This means that if you are replacing your roof on a single or two-family home, you do not need a construction permit.

However, if you are doing any of the following types of work, you will need a permit:

  • Adding a new roof layer over an existing roof
  • Changing the pitch of the roof
  • Changing the roof material
  • Structural changes to the roof

The Process of Acquiring a Roofing Permit

If you are doing any of the work that requires a permit, you will need to apply for a construction permit from your local municipality. You will need to provide detailed information about the work you are planning to do.

This includes the scope of the work, the materials you will be using, and the contractor you will be working with.

Once you have submitted your permit application, the local building department will review it. If everything is in order, you will be issued a permit.

During the construction process, your work will be inspected to ensure that it meets all building codes and safety standards.

Remember, failure to obtain a permit when required can result in fines, liens, lawsuits, insurance claims denial, and even removal of the roof.

The fines can range from $500 to $2,000 per day for each violation, and they can accumulate until the roofing work is brought into compliance.

Financial and Legal Considerations

Costs Involved in Permitting

When planning for a roof replacement in New Jersey, it is important to consider the costs associated with obtaining a permit.

The permit fee for a roof replacement in New Jersey used to range from $200 to $500, depending on the size and scope of the project.

However, as of 2024, a permit is no longer required for a roof replacement in New Jersey, which can save homeowners money.

Consequences of Non-Compliance

While a permit is no longer required for a roof replacement in New Jersey, it is important to note that non-compliance with local regulations can result in severe consequences.

If you fail to comply with local regulations, fines can range from $500 to $2,000 per day for each violation, and they can accumulate until the roofing work is brought into compliance.

Furthermore, non-compliance can result in liens, lawsuits, insurance claims denial, and even removal of the roof.

Insurance and Liability Implications

When replacing your roof, it is important to consider the insurance and liability implications of the project.

If you hire a contractor to replace your roof, make sure that they are licensed and insured like Commercial Roofing NJ. An uninsured contractor can leave you liable for the costs of an accident or property damage.

Additionally, if you fail to obtain a permit or comply with local regulations, your insurance company may deny your claim. This can happen in the event of damage or loss related to the roof replacement.

While a permit is no longer required for a roof replacement in New Jersey, it is important to consider the financial and legal implications of the project.

By ensuring compliance with local regulations and hiring a licensed and insured contractor, you can protect yourself from costly fines, liabilities, and insurance issues.

What is the Cheapest and Most Durable Roofing? A Comprehensive Guide

When it comes to roofing, you want to find a material that is both affordable and long-lasting.

With so many options available, it can be overwhelming to decide which roofing material is the best fit for your budget and needs.

low cost but durable roof

In this article, we will explore the cheapest and most durable roofing options available to help you make an informed decision.

One of the most popular and affordable roofing materials is asphalt shingles. They are easy to install and come in a variety of colors and styles to match your home’s exterior.

While they may not be the most durable option, they can last up to 20 years with proper maintenance.

Metal roofing is another cost-effective option that can last up to 50 years or more. They are resistant to fire, wind, and hail damage, making them a great choice for areas with severe weather conditions.

If you’re looking for a more durable and long-lasting option, consider investing in a composite shingle roof.

While they may have a higher upfront cost, they can last up to 50 years and are resistant to damage from weather and UV rays. Additionally, they come in a variety of styles and colors to match your home’s aesthetic.

Evaluating Roofing Materials

“When it comes to choosing the right roofing material for your home, there are several factors to consider. Durability, cost, and style are some of the most important aspects to keep in mind.” said David Spade of Star Roofing.

In this section, we will evaluate three popular roofing materials: metal, asphalt shingles, and slate/tile roofing.

Metal Roofing: Pros and Cons

Metal roofing is gaining popularity due to its durability and energy efficiency.

Metal roofs can last up to 50 years or more, and they are resistant to fire, wind, and hail. They are also low maintenance and can be recycled at the end of their lifespan.

However, metal roofing can be expensive, and the installation costs can be higher than other roofing materials.

Additionally, metal roofs can be noisy during rain or hailstorms, and they may require additional insulation to reduce the noise.

Asphalt Shingles: Affordability vs. Durability

Asphalt shingles are the most common roofing material in the United States due to their affordability and ease of installation.

They can last up to 20 years, but higher quality architectural shingles can last up to 30 years.

While asphalt shingles are affordable, they are not as durable as other roofing materials and may require more maintenance over time. They are also not as energy efficient as metal roofs.

Slate and Tile Roofing: Longevity and Style

Slate and tile roofing are known for their longevity and style.

They can last up to 100 years or more and are resistant to fire, wind, and hail. They also come in a variety of colors and styles, making them a popular choice for homeowners who want a unique look for their home.

However, slate and tile roofing can be expensive and heavy, which may require additional support for the roof structure.

They also require more maintenance than metal or asphalt shingles, and they may not be suitable for all climates.

Installation and Maintenance Considerations

When it comes to installing a new roof, it’s important to choose the right roofing contractor.

Look for a licensed and insured contractor with a good reputation in your area. You can ask for references and check their online reviews to ensure they have a history of quality workmanship.

Choosing the Right Roofing Contractor

Make sure the contractor you choose has experience installing the type of roofing material you’ve selected.

They should also be able to provide you with a detailed estimate that includes the cost of materials and labor like what Star Roofing does.

Don’t be afraid to ask questions and clarify any concerns you may have before signing a contract.

Understanding Roofing Warranties and Lifespan

It’s important to understand the warranty and lifespan of your new roof.

Most roofing materials come with a warranty that covers defects in materials or workmanship. However, the length of the warranty can vary depending on the manufacturer and type of material.

Make sure you understand what is covered under your warranty and how long it lasts.

Roofing lifespan can also vary depending on the type of material and weather conditions in your area.

For example, asphalt shingles typically last between 15-30 years, while metal roofs can last up to 50 years or more. Be sure to consider the climate in your area when selecting a roofing material.

Maintenance Tips for Long-Lasting Roofs

Proper maintenance is key to ensuring your new roof lasts as long as possible.

Regular inspections can help identify any issues before they become major problems.

Keep an eye out for cracked or missing shingles, leaks, and other signs of damage.

In addition to inspections, there are other maintenance tasks you can perform to keep your roof in good condition.

These include cleaning gutters and downspouts, trimming overhanging tree branches, and removing debris from the roof.

By choosing the right roofing contractor, understanding your warranty and roofing lifespan, and performing regular maintenance, you can ensure your new roof will be both durable and cost-effective for years to come.

Which Type of Roof Seldom Has to be Replaced? A Comprehensive Guide

David Spade of Star Roofing West Palm Beach said that “If you’re a homeowner, you know that your roof is one of the most important components of your house. It protects you and your belongings from the elements, and it also plays a significant role in your home’s curb appeal. However, like anything else, roofs don’t last forever.”

Eventually, you’ll need to replace your roof, and that can be a significant expense.

A sturdy metal roof rarely needs replacing

The good news is that some types of roofs last longer than others. If you’re in the market for a new roof, it’s essential to choose a type of roof that is durable and long-lasting. That way, you won’t have to worry about replacing it for many years to come. But which type of roof is the best choice? In this article, we’ll explore which type of roof seldom has to be replaced.

Durable Roofing Materials

When it comes to roofing materials, durability is a key factor to consider. You want a roof that can withstand harsh weather conditions, resist rust and fading, and last for many years to come.

In this section, we will take a look at some of the most durable roofing materials available today.

Metal Roofs

Metal roofs are a popular choice for homeowners who want a durable and long-lasting roof. They are available in a variety of materials, including steel, aluminum, copper, zinc, galvalume, and tin.

Metal roofs are resistant to harsh weather conditions and do not rust easily. They are also energy-efficient and can help reduce your heating and cooling costs.

Slate Roofs

Slate roofs are known for their quality and durability. They are made from natural slate, which is a type of metamorphic rock that is extremely durable and long-lasting.

Slate roofing can last for over 100 years and is resistant to weather conditions, fading, and fire. However, slate roofing is expensive and requires professional installation.

Concrete and Clay Tiles

Concrete and clay tiles are another durable roofing material that can last for many years. They are resistant to weather conditions, fading, and fire, and can be a good option for homeowners with long-term plans.

Concrete and clay tiles are available in a variety of styles and colors, and can add a touch of elegance to your home.

Factors Influencing Roof Longevity

When it comes to the longevity of your roof, several factors can impact its lifespan. Understanding these factors can help you make informed decisions about maintenance and repairs, and even help you choose a roofing material that will last longer.

Here are the three main factors that influence the longevity of your roof:

Maintenance and Repairs

Proper maintenance and timely repairs are crucial to extending the lifespan of your roof. Regular roof inspections can help identify minor issues before they turn into major problems.

Minor repairs, such as fixing leaks or replacing damaged shingles, can help prevent structural damage and prolong the life of your roof.

On the other hand, neglecting maintenance and repairs can lead to more extensive damage and the need for a full roof replacement, which can be costly.

Environmental Considerations

The climate and weather conditions in your area can also impact the longevity of your roof. Extreme weather, such as heavy rain, strong winds, and hail, can cause roof damage that may require repairs or even a full replacement.

Storm season can be especially damaging to roofs, so it’s important to have your roof inspected before and after the season.

Additionally, the age of your roof and the existing roofing material can also impact its ability to withstand weather conditions.

Installation and Construction

The quality of the installation and construction of your roof can also impact its longevity. Hiring a reputable roofing contractor like Star Roofing West Palm Beach, is important. They should follow local building codes and obtain the necessary permits. This can help ensure that your roof is installed properly.

A poorly installed roof may not last as long as one that is installed correctly. Additionally, the choice of roofing material can also impact the longevity of your roof. Some materials, such as metal, have a longer lifespan than others, such as asphalt shingles.

How to Quote a Roofing Job: A Comprehensive Guide

David Spade of Roofing West Palm Beach has to say “When it comes to roofing jobs, providing an accurate quote is essential. A well-prepared estimate can help you win jobs and ensure that you’re compensated fairly for your work.”

workers quoting on roof job

However, figuring out how to price a roofing job can be a challenge. There are many factors to consider, and if you get it wrong, it could end up costing you money.

To start, you’ll need to determine the scope of the job. This includes the size of the roof, the type of roofing material, and any special features or challenges that may impact the project.

Once you have a good understanding of what the job entails, you can begin to calculate the cost of materials and labor.

To estimate the cost of materials, you’ll need to know the square footage of the roof. This will help you determine how much roofing material you’ll need, as well as any additional supplies like underlayment, flashing, and fasteners.

For labor costs, you’ll need to consider factors like crew size, hourly wage, and the amount of time it will take to complete the job.

By taking all of these factors into account, you can provide an accurate quote that reflects the true cost of the job.

Preparing a Roofing Estimate

When preparing a roofing estimate, it is important to be accurate and thorough in your calculations. A well-prepared estimate will ensure that you are able to provide your client with a fair and competitive price for the job, while also ensuring that you are able to cover your costs and make a profit.

Understanding Roof Measurements

Accurate measurements are key to preparing a roofing estimate.

To get started, you will need to measure the dimensions of the roof. The primary measurement used in the roofing industry is a “square,” which is equal to 100 square feet of roofing surface.

You will also need to measure the pitch of the roof, which is the angle of the roof’s slope. The pitch is important because it will affect the amount of materials and labor required for the job.

You can use a roof pitch multiplier to calculate the pitch factor and adjust your measurements accordingly.

Identifying Materials and Costs

Once you have accurate measurements, you can start identifying the materials and costs required for the job.

This will include shingles, flashing, nails, underlayment, vents, and any other materials required for the job.

You should also consider the cost of any tools or equipment required for the job, as well as transportation costs, office rent, uniforms, and other overhead costs.

To estimate the cost of materials, you can use a roofing material calculator or consult with a shingle manufacturer to get an estimate of the cost per bundle.

It is important to factor in any waste or overage that may be required for the job, as well as any additional materials required for special features such as chimneys or skylights.

Calculating Labor and Overhead

Once you have identified the materials and costs required for the job, you can start calculating the labor and overhead costs.

This will include the hourly wage for your workers, as well as the number of labor hours required for the job.

You should also consider any overhead costs such as insurance, taxes, and benefits.

To calculate the labor costs, you can use a roofing labor calculator or consult with industry standards to get an estimate of the number of labor hours required for the job.

It is important to factor in any additional time required for special features such as chimneys or skylights.

Finalizing the Quote

Once you have all the necessary information about the job site, materials, and labor, it’s time to finalize the quote. This is the last step before presenting the estimate to the customer, so it’s important to make sure everything is accurate and accounted for.

Incorporating Additional Expenses

Before finalizing the quote, make sure to incorporate any additional expenses that may arise during the job.

This includes things like permits, inspections, and taxes. It’s important to include these expenses in the estimate to avoid any surprises for the customer later on.

Another expense to consider is the cost of any additional materials that may be needed during the job.

This includes things like flashing, chimneys, and skylights. Make sure to account for these expenses in the estimate to ensure an accurate bid.

Presenting the Estimate to the Customer

Once the quote is finalized, it’s time to present the estimate to the customer.

Make sure to clearly outline the scope of work, terms and conditions, and total cost of the job. This will give the customer peace of mind and help them understand what they’re paying for.

When presenting the estimate, be transparent about the pricing and any markup or profit margin. This will help build trust with the customer and ensure a profitable job for you.

Make sure to also include any warranties or guarantees for the work, as well as information about licensing and insurance. This will help the customer feel confident in your ability to provide quality work.

Finally, make sure to discuss invoicing and deposit requirements with the customer. This will help with cash flow and ensure a smooth payment process.

By following these steps and using roofing software to help with accounting and bidding, you can ensure a profitable and successful roofing job.